
Lawn
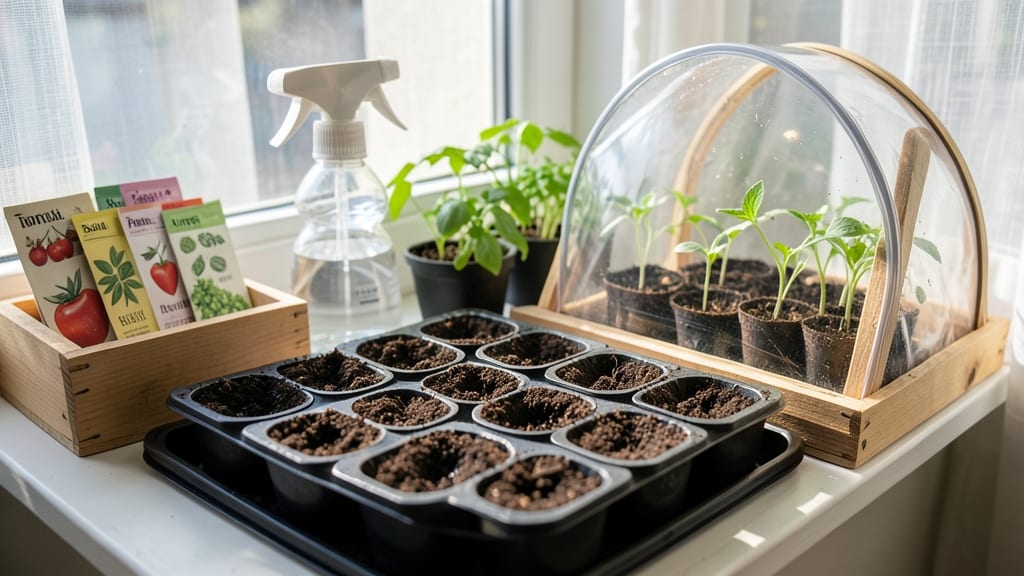
A DIY seed greenhouse lets you beat the clock on spring planting—no more waiting for last frost dates or struggling with cold soil. 🌱 I built mine last winter using a repurposed window frame and a clear plastic bin, and my seedlings now sprout 2-3 weeks earlier than before.
The trick is keeping humidity high and temperatures steady, even in a garage or basement.
You’ll need just three core supplies: a clear plastic container (or old window frame), a heat source (like a small heat mat), and a way to vent excess moisture.
My setup cost under $30 and fits on a kitchen counter—no fancy greenhouse skills required. The key is balancing warmth and airflow to prevent mold while speeding up germination.
By mid-March, you’ll watch tiny sprouts push through the soil, ready to transplant long before store-bought seedlings. The payoff? Longer growing seasons and varieties that wouldn’t survive your local climate otherwise. Plus, no more rushing to get seeds in the ground before the weather turns.
Works in apartments, garages, or even sunny windowsills—just adjust the setup for your space. Here’s how to avoid the most common pitfalls and keep your seedlings thriving until it’s safe to plant.
📚 In This Guide
- What you need
- Instructions
- Tips and common mistakes
- Wrapping up and next steps
What you need
- ● Plastic storage tote or large plastic bin – 1-2 units (10+ gallon capacity, clear walls for sunlight). Pro tip: 💡 Look for sturdy, stackable bins with secure lids.
- ● Drill with hole saw (3/8"–1/2") – For ventilation holes (or a manual hole punch if you’re DIY-friendly).
- ● Spray bottle with fine mist – 1 unit (for gentle hydration).
- ● Seed-starting mix – 1 bag (sterile, peat-based or coconut coir blend).
- ● Seeds of choice – Your pick! (fast-sprouting varieties like radishes, lettuce, or herbs work best).
- ● Scissors or utility knife – For cutting ventilation holes or trimming excess plastic.
- ○ Plastic wrap or clear plastic sheet – Optional but helpful for extra humidity (cut to fit lid).
- ● LED grow lights – 1-2 units (12–16 hours/day for low-light spots).
- ● Thermometer/hygrometer – 1 unit (to monitor ideal temps: 65–75°F).
- ● Small fan – 1 unit (for airflow; run on low).
- ● Labeling tags + markers – 1 pack (track seed varieties!).
- ● Reflective material (aluminum foil or Mylar) – 1 sheet (boosts light on dark walls).
Step-by-Step instructions for building a DIY seed greenhouse
Here’s how to create a sturdy, climate-controlled space that keeps seeds germinating reliably—no more waiting for spring or fighting leggy seedlings.
🪴 Step 1: Select and Prepare Your Base Structure
For a 4-plant setup, a 12-inch-tall wooden crate (or repurposed plastic bin) works perfectly. I use cedar because it resists rot and won’t leach chemicals into the soil. Drill ¼-inch drainage holes along the bottom—this prevents waterlogging, which kills seeds faster than cold snaps. Line the interior with black plastic sheeting (like landscape fabric) to block light from reaching the bottom layer, where condensation might collect.
Cut a clear plastic lid (like a repurposed takeout container or greenhouse dome) to fit snugly over the top. If using a dome, secure it with rubber bands or binder clips—you’ll need to remove it daily for ventilation. Here’s the thing: too much humidity inside will invite mold, so aim for 60-70% relative humidity during germination. A small ventilation flap (cut from the lid) helps regulate airflow without letting in drafts.
☀️ Step 2: Layer Insulation and Heat Source
Place a 1-inch layer of straw or shredded newspaper at the bottom for moisture retention—this mimics the natural insulation of forest floors where many seeds germinate. Next, add a thin layer of seed-starting mix (about ½ inch deep) to create a stable base for your seeds. For warmth, I use a low-wattage heat mat (like those designed for reptile tanks) set to 75-85°F. If you don’t have one, a black-lamp bulb (40 watts) placed 6 inches above the seeds works in a pinch.
Here’s where it gets fun: test the heat source first. Place your hand 1 inch above the mat—if it feels warm but not hot (like a cozy afternoon), you’re good. Too hot, and you’ll fry your seeds before they sprout. Pro tip: wrap the bulb or mat in aluminum foil to reflect heat downward evenly. This ensures consistent warmth without energy waste.
💧 Step 3: Sow Seeds and Manage Moisture
Sprinkle seeds directly onto the soil surface—most seeds germinate best when not buried deeply. Lightly press them in with your finger (just enough to make contact). Mist the soil with lukewarm water until it’s damp to the touch but not soggy. The goal is to keep the top ½ inch of soil consistently moist, not drenched. I use a spray bottle for precision—overwatering here leads to damping-off, a fungal disease that turns seedlings to mush overnight.
Place the lid on the greenhouse and position it in a bright, indirect light spot (like a north-facing windowsill). Avoid direct sunlight for the first 3-5 days—intense heat from the glass can cook your seeds. Watch for condensation on the lid: if it’s dripping, lift the lid for 10-15 minutes to air it out. You’ll see the first sprouts in 5-10 days, depending on the seed type.
⏰ Step 4: Transition to Light and Ventilation
Once 50% of seeds have sprouted, remove the lid entirely and move the greenhouse to a south-facing window or under grow lights for 14-16 hours of light daily. Seedlings need bright, indirect light to prevent legginess—if they stretch toward the light with pale stems, they’re starving for photons. At this stage, I switch to bottom-watering: place the greenhouse in a tray of ½ inch of water for 10 minutes daily. This keeps roots hydrated without disturbing the seedlings.
After 2 weeks, start hardening off by placing the greenhouse outside in a sheltered spot for 1-2 hours daily. Gradually increase exposure to full sun and wind over 7-10 days. You’ll know they’re ready for transplant when they don’t wilt after a full day outdoors. The beauty of this setup? You can extend the growing season by 4-6 weeks on either end, giving you a head start on the garden.
🌱 Step 5: Maintain and Expand
Once seedlings reach 2-3 inches tall, thin them to the strongest 1-2 plants per cell (if using a crate). Use sterilized scissors to snip at soil level—this prevents disturbing roots. Replace the soil layer every 6-8 weeks to avoid nutrient depletion. I top-dress with a thin layer of compost (about ¼ inch) to refresh the mix without overwhelming the seedlings.
For year-round use, store the greenhouse in a cool, dark basement during dormancy (winter or off-season). Clean it thoroughly with 10% bleach solution (1 part bleach to 9 parts water) to kill any lingering pathogens. Real talk: the first time I skipped this, I lost a batch of peppers to mold. Don’t make that mistake—sanitize like your next batch depends on it (because it does).
Tips & tricks for perfect DIY seed greenhouse performance
Here's what nobody tells you about building a greenhouse that actually works—these tricks save you from the heartbreak of failed sprouts.
Material Selection Matters: For Step 1, if you don't have cedar, use untreated pine—but avoid pressure-treated wood, which contains chemicals that can inhibit germination. The ¼-inch drainage holes are non-negotiable; if your crate doesn't have them, drill them yourself. I learned this the hard way after watching seedlings drown in their own condensation. For the plastic lid, clear vinyl or even repurposed bakery containers work better than thin plastic wrap, which traps too much heat and creates a sauna effect.
Heat Source Precision: In Step 2, that 75-85°F range is your sweet spot—any hotter and you'll cook your seeds before they sprout. I use a reptile heat mat because it's designed for consistent, even warmth. If you're using a black-lamp bulb, test it first by placing your hand 1 inch above—it should feel like a warm summer day, not a sauna. The aluminum foil trick isn't just about reflecting heat downward; it also prevents hot spots that can scorch seeds near the edges. Pro tip: place a small thermometer inside your greenhouse to monitor temperature—fluctuations wider than 5°F can stress seedlings.
Moisture Management is Everything: During Step 3, when you're misting with lukewarm water, think "damp sponge" not "wet towel." The top ½ inch of soil should stay consistently moist, but never soggy. I've found that using a spray bottle with a fine mist setting gives me better control than pouring. And here's the secret: if condensation is dripping onto your seeds, you're overdoing it. Lift that lid for 10-15 minutes to let excess moisture evaporate—this simple habit prevents 90% of damping-off cases. For the first 3-5 days, keep your greenhouse in bright but indirect light; direct sunlight through the plastic acts like a magnifying glass and can cook your seeds.
Light Transition Strategy: When you reach Step 4 and remove the lid for 14-16 hours of light daily, don't just move to any window. South-facing gets the most light, but if that's not an option, supplement with grow lights. The key is preventing leggy seedlings—if they're stretching toward light with pale stems, rotate your greenhouse daily so all sides get equal exposure. For bottom-watering, that ½ inch of water for 10 minutes is perfect; any longer and you risk waterlogging the roots. And when hardening off, start with just 1-2 hours—gradual exposure is crucial, or you'll shock your seedlings into shock (literally).
Pro Tips for Diy Seed Greenhouse
- Here's what nobody tells you about building a greenhouse that actually works—these tricks save you from the heartbrea...
- Material Selection Matters: For Step 1, if you don't have cedar, use untreated pine—but avoid pressure-treated wood, ...
- Heat Source Precision: In Step 2, that 75-85°F range is your sweet spot—any hotter and you'll cook your seeds before ...
Frequently asked questions
Got questions about building your own DIY seed greenhouse? You’re not alone! Here are some of the most common concerns—and straightforward answers—to help you get started with confidence.
What’s the best time of year to start a DIY seed greenhouse?
A DIY seed greenhouse works year-round, but timing depends on your climate and goals. For fastest sprouts, start in early spring or late summer when temperatures are mild. In colder regions, a greenhouse lets you kick off seeds indoors 6–8 weeks before the last frost. Pro tip: Use a thermometer to monitor heat—most seeds thrive between 65–75°F.
Can I use a DIY greenhouse in winter?
A well-insulated greenhouse extends your growing season by trapping heat. Add a clear plastic sheet or double-layered polycarbonate panels for extra insulation. Place it in a sunny spot and consider a small heating mat (or even a DIY "greenhouse blanket" with old towels) for frost-prone areas. Just avoid overcrowding—airflow prevents mold!
What’s a budget-friendly alternative if I don’t have materials?
No fancy supplies? No problem! Repurpose a plastic storage bin (with a lid), a clear plastic tote, or even a cut-open milk jug for small seeds. For larger setups, check thrift stores for glass jars, fish tanks, or old windows. DIY hack: Poke holes in the lid for ventilation, and use a spray bottle for watering instead of a hose.
How do I keep pests out of my DIY greenhouse?
Pests like fungus gnats and aphids love damp seedlings! Start with sterilized soil (bake it in the oven for 30 mins at 200°F) and avoid overwatering. For natural defense:
- Yellow sticky traps for flies
- Neem oil spray (1 tsp per quart of water) for soft-bodied bugs
- Fine mesh screening over vents
How long until I see sprouts in a DIY greenhouse?
Germination time varies by seed type, but most fast-sprouting seeds (like radishes, lettuce, or beans) appear in 3–14 days. Slower growers (tomatoes, peppers) take 1–3 weeks. Key factors:
- Consistent moisture (keep soil damp, not soggy)
- Warmth (use a seedling heat mat if needed)
- Light (place near a south-facing window or use a grow light for 12+ hours/day)
Wrapping up and next steps
Building your own DIY seed greenhouse is a game-changer for year-round gardening—no fancy tools or hefty budgets required! 🌱 With just a few materials and a little creativity, you’ve unlocked the secret to faster sprouts, healthier plants, and a thriving garden no matter the season.
Now that you’re armed with the know-how, why not start small?
Pick a sunny spot, gather your supplies, and take the first step today! Whether you’re a beginner or a seasoned gardener, every seedling starts with a single sprout—and you’ve just made it easier than ever. Happy growing! 🌿