
Lawn
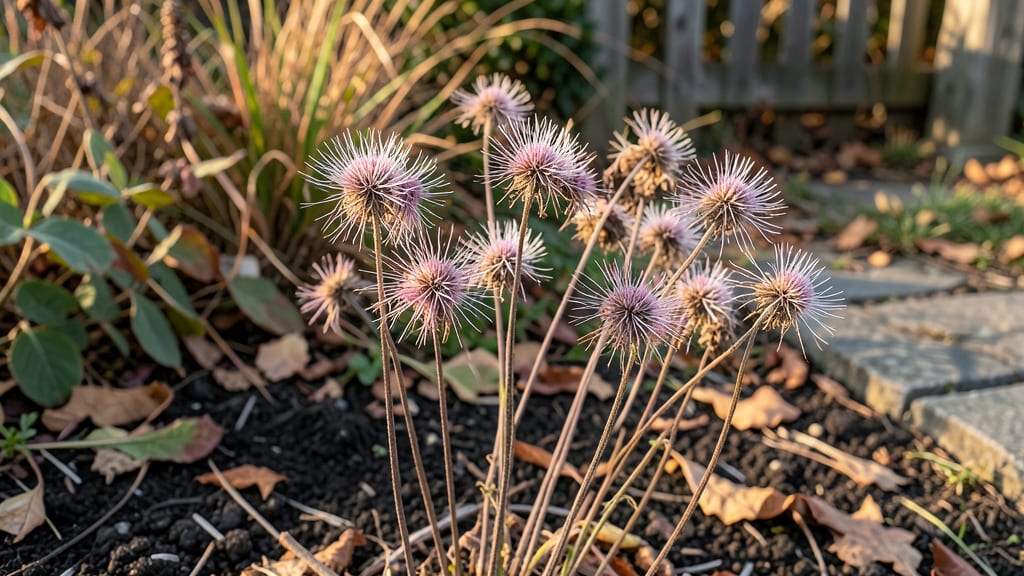
Anemone seed heads transform from delicate blooms into nature’s own seed pods—no twisting required. 🌿 The secret to collecting them lies in timing: wait until the pods turn papery brown and begin splitting open naturally, usually in late summer or early fall.
I’ve learned the hard way that harvesting too early means immature seeds, while waiting too long means the wind takes them first.
Gather the pods on a dry day and store them in a breathable paper bag until they release seeds on their own. This zero-waste method saves you time and ensures you capture every viable seed for next season’s garden.
Anemones thrive in well-draining soil with partial shade, so plant them where they’ll get morning sun and afternoon relief from the heat.
When you’re ready to plant, scatter the seeds on the soil surface—they need light to germinate, so don’t bury them. Keep the soil lightly moist but never soggy, and you’ll see tiny shoots emerge in about 4-6 weeks.
The key is patience; anemones grow slowly but reward you with striking blooms year after year.
For best results, sow seeds in early spring or late summer, and avoid overwatering once established. These perennials multiply over time, so you’ll have more seed heads than you know what to do with—just like the ones you started with. Happy collecting!
📚 In This Guide
- What you need
- Instructions
- Tips and common mistakes
- Wrapping up and next steps
What you need
- ● Pruning shears or sharp garden scissors – Clean, sterilized tools (1 pair) to snip seed heads cleanly.
- ● Paper bags or breathable mesh bags – Unbleached kraft or cotton bags (2–3 bags, 12x15 inches) for air circulation.
- ○ Gloves (optional but recommended) – Nitrile or cotton gloves to protect hands from thorns or sap.
- ● Labeling tags & marker – Waterproof tags (5–10 tags) to note varieties or harvest dates.
- ● Drying tray or screen – Wire mesh or perforated plastic (18x24 inches) for seed head drying.
- ● Seed-saving envelope kit – Pre-folded paper envelopes (for long-term storage).
- ● Small hand trowel – For delicate soil checks if harvesting near roots.
- ● Spray bottle with water – To mist seed heads if drying indoors.
- ● Digital scale – For precise seed weight tracking (if bulk-saving).
How to harvest anemone seed heads without the twist
Here's how I collect anemone seed heads cleanly—no stubborn stems, no wasted pods.
🌱 Step 1: Wait for Pods to Fully Dry
Harvest anemone seed heads only when they've turned a pale tan and feel lightweight when held. You'll know they're ready when the papery outer layers begin to flake slightly at the touch. If the pods still feel plump or green, they need more time—harvesting too early means the seeds won't separate properly.
I like to check pods on dry, sunny mornings after a week or two of no rain. The seeds inside mature best under these conditions. If you're unsure, gently squeeze a pod—if it crumbles easily, it's ready. If it resists, wait another day or two.
✂️ Step 2: Snip Stems at the Base
Use clean, sharp scissors to cut the stem 1-2 inches below the seed head. Avoid tearing the stem—this prevents the pod from splitting open prematurely. I always snip at a slight angle to create a small target area for drying later.
Place the cut stems in a low-humidity area (like a covered porch or garage) for 24 hours to let the cut heal slightly. This step prevents the seed heads from absorbing moisture and mold before you process them. Never leave them in direct sunlight—they'll overheat and crack open too soon.
🪴 Step 3: Remove Seed Heads from Stems
Once the stems are dry, gently twist the seed head counterclockwise while holding the stem steady. The head should separate cleanly at the base—if it resists, the pods aren't fully mature yet. Lay the seed heads on a clean, flat surface (like a baking sheet) in a single layer.
Here's the trick: Don't shake or rub the pods—this can damage the delicate seeds inside. Instead, let them sit undisturbed for 3-5 days in a warm, dry spot (around 70°F). The pods will naturally open at their seams when they're ready, releasing seeds without effort.
💧 Step 4: Separate Seeds from Chaff
Once the pods have opened, use a fine-mesh sieve or paper bag to catch the seeds as you gently rub the dried heads between your fingers. The seeds will fall through while the empty pod bits stay behind. I like to do this over a dark-colored tray—the seeds stand out clearly against the background.
Store the seeds in a paper envelope (not plastic) in a cool, dark place. Label it with the date and variety—anemone seeds lose viability after 1-2 years. If you notice any mold or musty smells during storage, discard the batch immediately.
⏰ Step 5: Plant or Store for Next Season
Anemone seeds need cold stratification to germinate. Plant them outdoors in fall or place them in a sealed bag with damp sand in the fridge for 4-6 weeks before sowing. Press them ¼ inch deep in well-draining soil and keep them moist until sprouts appear.
Real talk: Anemones can be finicky. If you're not ready to plant right away, store the seeds in the fridge until spring. Just remember—fresh seeds germinate best, so don't wait too long. I've had better luck with seeds planted within 6 months of harvest.
Tips & tricks for perfect anemone seed collection
These little tricks will make your anemone seed harvesting effortless and frustration-free.
Timing Secret: The 24-hour drying period after cutting stems is your best friend. I've learned this the hard way—skipping it leads to moldy pods. Place stems in a spot with indirect airflow (like a covered porch) rather than a completely enclosed space. This prevents moisture buildup while still allowing the cut to heal properly.
Visual Maturity Check: In Step 1, when testing pod readiness, look for three clear signs: pale tan color, lightweight feel, and slight flaking. I also check the stem attachment point—if it's dry and papery, the pods are ready. Harvesting too early means seeds won't separate cleanly, and you'll end up with wasted pods.
Temperature Matters: The 70°F warm spot for drying pods is ideal because it's warm enough to encourage natural opening without causing premature cracking. If your home runs cooler, place the pods near a sunny window during the day and move them to room temperature at night. Never use heat sources like radiators—they can cook the seeds before they're ready.
Equipment Upgrade: For Step 4, I recommend using a fine-mesh sieve with a deep bowl rather than just a paper bag. The extra depth catches more seeds that might otherwise blow away. You can also use a white plate as a contrast background—dark seeds show up much better against white than they do on dark trays.
Pro Tips for Anemone Seed Heads
- These little tricks will make your anemone seed harvesting effortless and frustration-free.
- Timing Secret: The 24-hour drying period after cutting stems is your best friend. I've learned this the hard way—skip...
- Visual Maturity Check: In Step 1, when testing pod readiness, look for three clear signs: pale tan color, lightweight...
Frequently asked questions
Got questions about anemone seed heads?
Here are some of the most common ones—plus quick, practical answers to help you make the most of these unique garden treasures!
When is the best time to collect anemone seed heads?
Collect seed heads in late summer to early fall (August–October), when they’ve fully dried and turned papery brown. Wait until the pods are crispy to the touch—this ensures maximum viability. Avoid collecting if rain is forecasted, as moisture can reduce seed quality. Pro tip: Morning collection is ideal since dew can make pods damp.
Can I save seeds from store-bought anemones?
Unfortunately, most anemones sold in stores (especially hybrids or cultivars) are sterile and won’t produce viable seeds. For seed-saving success, opt for heirloom varieties or seeds from reputable nurseries. If you’re unsure, check the plant label—it often notes whether seeds are viable. Pro tip: Grow from seed if you want unique, garden-hardy anemones!
How do I store anemone seeds for planting?
Place dried seed heads in a paper bag (not plastic!) in a cool, dry spot for 1–2 weeks to fully dry. Once dry, shake pods to release seeds, then store them in an airtight container with silica gel packets to prevent mold. Keep seeds in the fridge for up to 2 years. Pro tip: Label containers with the collection date and variety!
Why aren’t my anemone seed heads opening or drying?
Seed heads may fail to dry if humidity is too high or if the plant lacks sunlight. Ensure your anemones get at least 6 hours of sunlight daily and improve airflow by spacing plants 12–18 inches apart. If fungal issues (like powdery mildew) appear, remove affected pods immediately. Pro tip: Prune foliage around seed heads to speed up drying.
What can I do with anemone seed heads if I don’t want to plant them?
Don’t toss them! Use dried seed heads for winter arrangements, craft dried wreaths, or add texture to potpourri. You can also crush them into organic mulch for your garden. For a whimsical touch, glue pods to greeting cards or frame them as botanical art. Pro tip: Freeze pods for 24 hours to kill pests before crafting!
Wrapping up and next steps
Anemone seed heads offer a simple, eco-friendly way to propagate these stunning perennials while embracing zero-waste gardening. Their twist-free pods make collection effortless, ensuring you can grow more beauty without the mess.
Whether you’re a seasoned gardener or just starting out, these pods are a game-changer for sustainable landscaping.
Ready to give it a try? Grab your gloves, head to the garden, and let those seed heads inspire your next planting project! 🌱✨ Recap the steps or check out answers to any lingering questions before you begin.