
Lawn
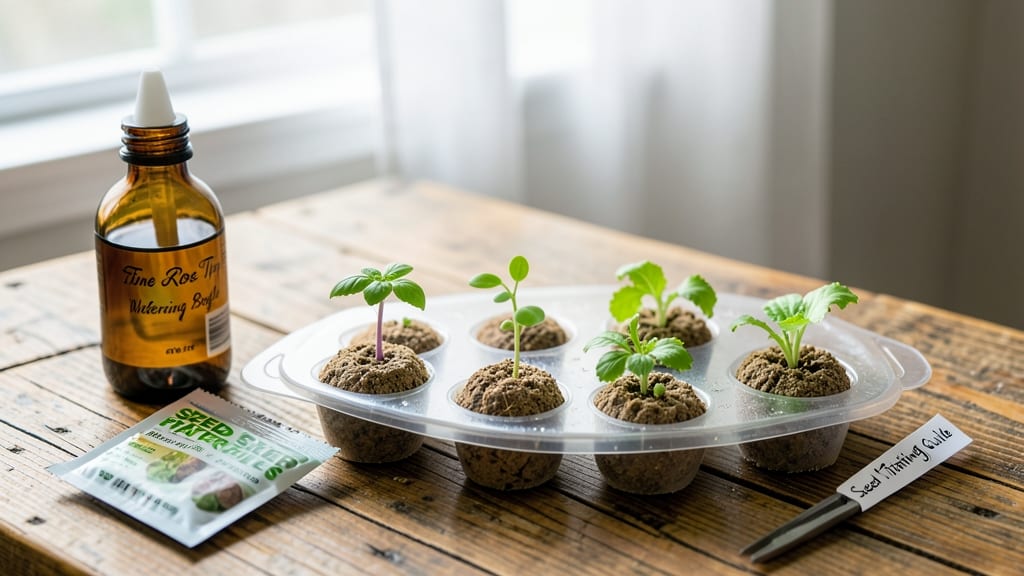
Seed starter pellets how to use them transform seed-starting from messy to foolproof in just minutes. 🌱 I used to dread the soil prep, but these compressed blocks of peat or coir expand into perfect little pots—no measuring, no mixing, just add water and plant.
The secret? Their uniform moisture and aeration create the ideal environment for tiny roots to take hold fast.
You’ll need pellets (1-2 inches), a seed tray or container, seeds, and a spray bottle for gentle watering. The process takes less than 15 minutes—soak the pellets, let them expand, nestle seeds on top, and cover lightly.
No more struggling with compacted soil or uneven moisture that drowns seedlings before they sprout.
Within days, you’ll see sprouts pushing through the soil surface, their first true leaves unfurling like tiny green umbrellas. The best part? These little blocks transplant directly into the garden with minimal root disturbance, giving seedlings a head start that store-bought plants can’t match.
Perfect for beginners or anyone tired of seed-starting failures. Here’s how to do it right the first time—no black thumb required.
📚 In This Guide
- What you need
- Instructions
- Tips and common mistakes
- Wrapping up and next steps
What you need
- ● Seed starter pellets: Quantity: 1–2 bags (depending on your seedling needs; standard bags contain ~30–50 pellets).
- ● Size: Choose 1.5–2.5 inches (3.8–6.4 cm) for most seedlings (e.g., herbs, flowers, veggies). Larger pellets (3–4 inches) work for tomatoes, peppers, or root crops.
- ● Seeds: High-quality, fresh seeds (check the packet for sowing depth—pellets hold moisture but may not always match traditional soil guidelines).
- ● Water: Room-temperature, dechlorinated water (let tap water sit out for 24 hours or use filtered/distilled water).
- ● Tray or container: Size: Large enough to hold pellets with 1–2 inches of space between them (e.g., 10x20-inch seedling trays).
- ● Material: Plastic, ceramic, or biodegradable (if you plan to transplant directly into the ground).
- ● Spray bottle: With a fine mist setting (for gentle watering).
- ● Scissors or knife: For opening pellet bags and trimming excess netting (if using netting-wrapped pellets).
- ○ Gloves (optional): To keep hands clean while handling pellets or soil.
- ● Humidity dome or plastic wrap: To retain moisture while seeds germinate (reduce watering frequency!).
- ● Grow lights or sunny windowsill: Seedlings need 12–16 hours of light daily (south-facing windows or LED grow lights work best).
- ● Fertilizer (diluted): A balanced, water-soluble fertilizer (5-5-5 or 10-10-10) for when seedlings sprout their first true leaves.
- ● Plant labels: To track seed varieties (especially useful for mixed trays!).
- ● Heat mat (for cold climates): Speeds up germination for slow starters like peppers or basil.
Step-by-Step instructions for using seed starter pellets
Here's my foolproof method for using these magical soil blocks to get seedlings off to a flying start.
🌱 Step 1: Hydrate the Pellets Until Fully Expanded
Place your seed starter pellets in a shallow tray or directly in your seed-starting container. Pour warm water (around 70-75°F) over them until they begin to absorb moisture and expand. You'll see them grow to about 2-3 times their original size within 5-10 minutes. The goal is to fully saturate them so they become firm, spongy blocks—think of them like little soil bricks.
Don't skimp on water here. I've seen growers use too little and end up with pellets that expand unevenly, creating air pockets that stunt root growth. Keep adding water until they've doubled in size and feel solid to the touch. Once fully expanded, they should hold their shape when gently squeezed but not crumble.
💧 Step 2: Prepare the Pellets for Planting
Once expanded, let the pellets sit for 10-15 minutes to drain any excess water. You want them damp but not dripping. This prevents waterlogging, which can suffocate seeds before they even germinate. I like to use a colander or strainer to drain them if they're especially wet—just give them a gentle shake to remove surface water.
Now, create small dimples in the top of each pellet using your finger or a pencil. These tiny indentations are perfect for holding seeds without burying them too deep. The rule of thumb is to plant seeds at a depth equal to 2-3 times their diameter. For tiny seeds like lettuce, that's just a light press; for larger seeds like beans, you'll need a slightly deeper dimple.
🌿 Step 3: Plant Seeds Directly Into the Pellets
Place 1-2 seeds into each dimple, depending on the seed's size and your tolerance for thinning later. For delicate seeds like marigolds, I plant just one per pellet to avoid competition. Press them gently into the soil—just enough to ensure good contact but not so deep they struggle to reach the surface. Cover lightly with a pinch of the pellet material if needed.
Here's where the magic happens: the pellets' structure encourages vertical root growth right from the start. You'll see roots growing downward through the entire pellet within 3-5 days of germination. This is why pellets are so effective—they create an ideal environment for strong, unbroken root systems that transplant beautifully.
☀️ Step 4: Provide Ideal Conditions for Germination
Place your planted pellets in a humidity dome or cover them with plastic wrap to retain moisture and warmth. Keep them in a location with a consistent temperature of 65-75°F—a seedling heat mat helps here if your home runs cooler. You should see first sprouts in 3-10 days, depending on the plant type. Watch for the first true leaves (not the initial seed leaves) to appear before removing the cover.
During this stage, I avoid watering from above—it can dislodge seeds or create uneven moisture. Instead, I use a spray bottle to mist the surface lightly when the top feels dry to the touch. Overwatering now leads to damping-off, a fungal disease that collapses seedlings overnight. The pellets' structure helps prevent this, but proper airflow is still key.
⏰ Step 5: Transition to Light and Care for Young Seedlings
Once seedlings show their first true leaves, move them to a bright location with 12-14 hours of light daily. A south-facing window works, but I supplement with a grow light to ensure strong, stocky growth. Keep the light 2-4 inches above the seedlings and raise it as they grow to prevent legginess. You'll know your light is right when seedlings grow compact and dark green, not stretched and pale.
Water when the top of the pellet feels dry to the touch—usually every 2-3 days. The pellets' structure makes them easy to monitor; they'll shrink slightly when thirsty and expand again after watering. Fertilize lightly with a diluted liquid fertilizer (half-strength) when seedlings develop their second set of true leaves—this prevents burning tender roots.
Tips & tricks for perfect seed starting with pellets
These game-changing tricks will help you maximize your seed starter pellets for the fastest, healthiest seedlings possible.
Water Temperature Matters: The warm water at 70-75°F in Step 1 isn't just about comfort—it mimics natural soil temperatures and kickstarts the hydration process. If your tap water runs cold, let it sit in a sunny window for 10 minutes before using. Cold water slows expansion and can create uneven moisture distribution, leading to weak root development. For even better results, use rainwater or distilled water, as tap water's chlorine can inhibit germination in some seeds.
Visual Expansion Check: In Step 1, the pellets should expand to 2-3 times their original size within 5-10 minutes, but don't rely solely on the clock. Gently squeeze a pellet—it should feel firm like a damp sponge, not mushy. Uneven expansion often means air pockets where roots can't grow. If some pellets expand faster, rotate your tray to ensure consistent saturation. This simple check prevents the most common mistake that stunts seedling growth.
Seed Depth Precision: The 2-3 times seed diameter rule in Step 2 might seem abstract, so here's a practical guide: for tiny seeds like basil (1/16" diameter), plant just 1/8" deep; for larger seeds like beans (1/4" diameter), aim for 1/2". Press seeds gently but firmly—they need good soil contact to germinate. If you're unsure, err on the shallower side; deeper planting can delay germination or cause seeds to rot before sprouting.
Humidity Dome Hack: In Step 4, while humidity domes or plastic wrap create the perfect environment, they also trap heat. Place your setup in a warm spot (like on top of the fridge) for the first 24 hours to accelerate germination. After sprouts appear, remove the cover gradually—start by lifting it for 10 minutes daily to harden off seedlings before full exposure. This mimics natural weather patterns and prevents shock when transitioning to regular light.
Pro Tips for Use Seed Starter Pellets
- These game-changing tricks will help you maximize your seed starter pellets for the fastest, healthiest seedlings pos...
- Water Temperature Matters: The warm water at 70-75°F in Step 1 isn't just about comfort—it mimics natural soil temper...
- Visual Expansion Check: In Step 1, the pellets should expand to 2-3 times their original size within 5-10 minutes, bu...
Frequently asked questions
Got questions about seed starter pellets? You’re not alone! Here are answers to the most common ones to help you grow confidently with these handy soil blocks.
What are seed starter pellets made of?
Seed starter pellets are typically made from 100% peat or coconut coir, compressed into small, lightweight blocks. They’re sterile, moisture-retentive, and free of chemicals, making them perfect for germinating seeds without soil-borne diseases. Just soak, plant, and watch your seeds sprout!
How long do I soak the pellets before planting?
Soak the pellets in water for 10–15 minutes until they expand to about 2–3 times their original size. Over-soaking can lead to waterlogging, so drain excess water after swelling. Pro tip: Use room-temperature water for best results!
Can I reuse seed starter pellets?
Unfortunately, seed starter pellets can’t be reused after germination. Once they’ve been used, their structure breaks down, and they lose their ability to hold moisture effectively. However, you can compost them or repurpose the leftover soil for potting mixes!
What’s the best temperature for germinating seeds in pellets?
Most seeds germinate best in 65–75°F (18–24°C), but check your seed packet for specifics. Use a seedling heat mat if your space is too cool. Keep pellets consistently moist (not soggy) and place them in bright, indirect light until sprouts appear.
Why aren’t my seeds germinating in the pellets?
If seeds aren’t sprouting, check these common issues:
- Inconsistent moisture: Pellets may dry out or stay too wet.
- Incorrect temperature: Too cold or hot can stall germination.
- Old or low-quality seeds: Test viability by soaking seeds in water—if they sink, they’re likely good!
- Light exposure: Some seeds (like veggies) need darkness to sprout.
Wrapping up and next steps
Seed starter pellets are a game-changer for gardeners looking to kickstart their seedlings with ease! 🌱 By following these simple steps—hydrating, planting, and nurturing—you’ll create the perfect environment for fast, healthy growth.
Whether you're a beginner or a seasoned pro, these soil blocks simplify the process and boost your success rate.
Now that you’re ready to dive in, grab your pellets and start planting! Experiment with different seeds, track your progress, and soon you’ll be transplanting thriving seedlings into your garden. Happy growing! 🌿