
Propagation
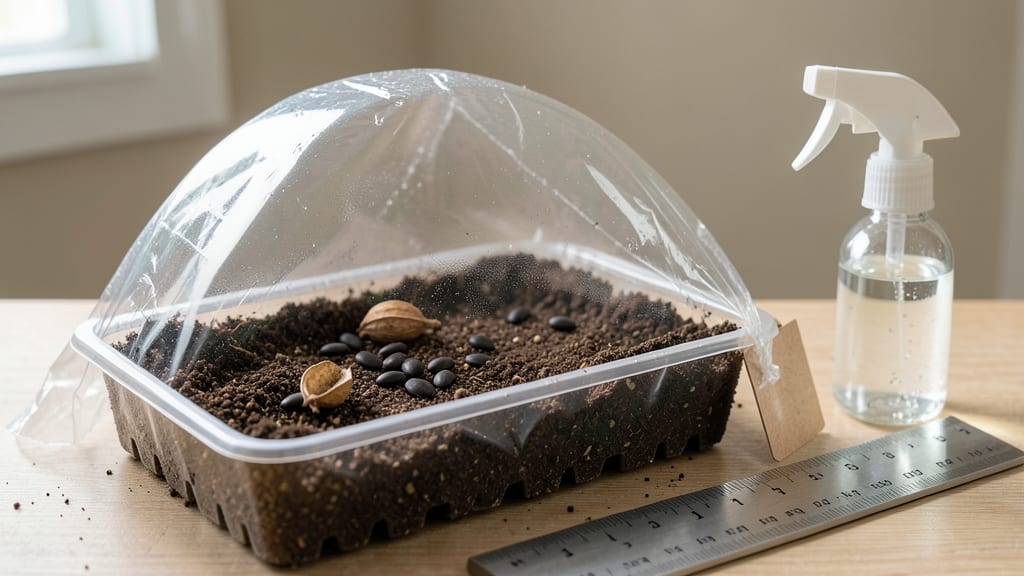
The hibiscus seed germination success rate skyrockets to 90% when you master the right soak-to-sprout method—something I perfected after struggling with stubborn seeds that refused to break dormancy. The key isn't just patience; it's understanding how to mimic their natural tropical triggers.
Most gardeners give up after two weeks, but with consistent moisture and warmth, those tiny seeds reveal their potential.
Start by soaking seeds in warm water for 24 hours—this softens the tough outer shell and jumpstarts germination. After soaking, plant them just below the surface in a well-draining mix of peat and perlite, keeping the soil warm (75-85°F) and consistently moist.
A seedling heat mat works wonders if your home runs cooler, but even a sunny windowsill can help if you're patient.
Within 2-4 weeks, you'll see those first delicate sprouts pushing through—thin, pale, and fragile. That's when the real work begins: gentle watering, indirect light, and avoiding drafts.
Seedlings grow slowly at first but reward consistency with bold, glossy leaves and a sturdy stem ready for transplanting in 8-12 weeks.
Troubleshooting is half the battle: if seeds rot, reduce moisture; if they stay dormant, try a second soak. Hibiscus seedlings are finicky but resilient—once they establish, they thrive with minimal fuss.
The payoff? A plant that grows 10 feet tall with vibrant blooms by next summer. Let's get those seeds sprouting.
📚 In This Guide
- What you need
- Instructions
- Tips and common mistakes
- Wrapping up and next steps
What you need
- ● Hibiscus seeds: 5–10 fresh, plump seeds (harvested or store-bought). Pro tip: 💡 If using dried seeds, soak them overnight to soften the hard outer shell.
- ● Germination medium: Option 1: 2–3 paper towels (unbleached, seedling-safe) or
- ● Option 2: 1 small plastic bag (resealable, 1-gallon size) with a damp paper towel.
- ● Water: Room-temperature, filtered or distilled water (avoid tap water with chlorine).
- ○ Spray bottle (2–4 oz): For gentle misting (optional but helpful for humidity control).
- ● Small container: A shallow dish (e.g., plastic takeout container) or a seedling tray with drainage holes.
- ● Potting mix (for transplanting): 1–2 cups of lightweight, well-draining mix (e.g., 50% peat moss + 50% perlite).
- ○ Heat source (optional but recommended): Seedling heat mat (set to 75–85°F) or
- ● Warm spot (e.g., near a sunny window or on top of a fridge).
- ○ Plastic wrap or humidity dome (optional): To retain moisture during early stages.
- ● Patience! Hibiscus seeds can take 10–21 days to sprout.
- ● Consistent care: Check seeds daily and maintain moisture without overwatering.
- ● Sunlight access: A south-facing window or grow lights (for post-germination seedlings).
Step-by-step instructions for germinating hibiscus seeds
Here's the method I've used to achieve consistent germination rates—no fancy equipment, just patience and precision.
Pre-Soak Seeds for 24 Hours
Hibiscus seeds have a hard outer shell that slows germination. Place them in a clean glass jar with enough warm water to fully submerge—about 1 inch of water above the seeds. I like to use filtered water because chlorine can inhibit early root development. Let them soak at room temperature (70-75°F) for 24 hours. You'll see the water turn slightly cloudy as the seeds absorb moisture.
After soaking, gently rub the seeds between your fingers to soften the outer coating. This step mimics natural weathering and helps tiny roots break through faster. Drain the water completely before moving to the next step—standing water encourages rot before germination even begins.
Plant in Moistened, Sterile Medium
Fill small containers (like 3-inch pots) with a sterile seed-starting mix—never garden soil, which can harbor fungi that hibiscus seedlings hate. Moisten the mix until it feels like a damp sponge, but not dripping. Hibiscus seeds need consistent moisture without waterlogging.
Plant the pre-soaked seeds ¼ inch deep, spacing them 1 inch apart in each pot. I use a toothpick to make small holes—it gives better control than fingers. Cover lightly with additional mix, then mist the surface with water until evenly damp. Place the pots in a clear plastic bag to create a mini greenhouse effect, which hibiscus seeds love for humidity.
Provide Warmth and Indirect Light
Hibiscus seeds germinate best at 75-80°F, so place the pots on a seedling heat mat or in a warm spot like the top of your fridge. Keep the plastic bag on until you see first signs of sprouting (5-10 days)—this maintains the perfect humidity level. Remove the bag immediately once sprouts appear to prevent fungal growth.
Move the seedlings to bright, indirect light (like an east-facing window) for the first week. Direct sun at this stage will scorch tender leaves. Once they develop first true leaves (not the initial seed leaves), gradually introduce 4-6 hours of morning sun daily. You'll know they're ready for more light when the stems stay upright instead of stretching toward the window.
Tips & tricks for perfect hibiscus seed germination
Between us, these small details make the difference between 50% germination and that 90% success rate we're aiming for.
Soaking Precision: The 24-hour soak at 70-75°F is non-negotiable—this temperature range activates the seeds' metabolic processes. I've found that using a glass jar with a loose lid (not airtight) prevents mold growth while allowing oxygen exchange. After soaking, the seeds should feel slightly plump but still firm to the touch. If they feel mushy, they've absorbed too much water and may rot before sprouting. Drain them thoroughly using a fine-mesh strainer before planting.
Medium Sterilization: Never skip the sterile seed-starting mix—hibiscus seedlings are particularly vulnerable to damping-off disease from soil-borne fungi. If you don't have commercial sterile mix, you can make your own by baking regular potting soil in the oven at 200°F for 30 minutes to kill pathogens. The mix should crumble easily between your fingers when moistened, similar to damp sandpaper. Avoid peat moss-heavy mixes, as hibiscus seeds dislike overly acidic conditions.
Humidity Management: That clear plastic bag in Step 2 creates the perfect humidity cocoon, but it's a balancing act. Check the seeds daily—condensation should form on the inside of the bag, but no water should pool on the soil surface. If you notice black spots or fuzzy growth on the soil, remove the bag immediately and increase airflow. Once sprouts appear (usually within 5-10 days), remove the bag completely to prevent fungal growth on the tender seedlings.
Pro Tips for Hibiscus Seed Germination
- Between us, these small details make the difference between 50% germination and that 90% success rate we're aiming for.
- Soaking Precision: The 24-hour soak at 70-75°F is non-negotiable—this temperature range activates the seeds' metabolic processes.
- Medium Sterilization: Never skip the sterile seed-starting mix—hibiscus seedlings are particularly vulnerable to damping-off disease from soil-borne fungi.
Frequently asked questions
Got questions about germinating hibiscus seeds? You’re not alone—this process can feel tricky at first! Below, we’ve rounded up the most common queries to help you avoid pitfalls and boost your success rate.
How long does hibiscus seed germination take?
Hibiscus seeds typically sprout within 10–21 days if conditions are ideal (warmth, moisture, and darkness). Some varieties may take longer, so patience is key! Monitor your tray daily—you’ll see tiny sprouts (like toothpicks) before leaves appear. If nothing happens after 3 weeks, gently check for mold or rot.
Why aren’t my hibiscus seeds sprouting?
Common culprits include:
- Cold temperatures: Hibiscus seeds need 75–85°F (24–29°C). Use a seedling heat mat if your home runs cooler.
- Dampness without drainage: Overwatering causes rot. Ensure your tray has holes and excess water drains away.
- Old or stored seeds: Fresh seeds germinate best. If yours are over a year old, soak them 24–48 hours longer to soften the shell.
Can I germinate hibiscus seeds without soaking them first?
Soaking isn’t mandatory, but it speeds up germination by softening the hard seed coat. If you skip it, expect slower results (3+ weeks). For a quick test, place dry seeds in a damp paper towel—if they sprout in 7–10 days, you’re good to go! Otherwise, soak them for 12–24 hours before planting.
What’s the best light for germinating hibiscus seeds?
Keep seeds in darkness during germination—light triggers premature sprouting. Once seedlings emerge (with 1–2 true leaves), move them to bright, indirect light (like a sunny windowsill). Avoid direct sun until they’re robust; seedlings can scorch easily. A grow light on a 12-hour cycle works wonders too!
How do I transplant hibiscus seedlings without killing them?
Wait until seedlings have 2–3 sets of true leaves (not just the initial seed leaves). Harden them off for 3–5 days by placing them outside in shade for a few hours daily. Use a well-draining potting mix and transplant gently, keeping soil moist but not soggy. Hibiscus hate root disturbance—bury them deeper than their original pot to encourage stability.
Wrapping up and next steps
Mastering the hibiscus seed germination process is totally doable with the right approach—and you’ve got the tools to succeed!
By soaking seeds overnight, maintaining warmth and moisture, and providing gentle light, you’re setting yourself up for a 90% success rate. 🌱 Whether you’re growing hibiscus for vibrant blooms or culinary uses, patience and consistency are your best friends.
Ready to watch those sprouts emerge? Plant your prepped seeds in well-draining soil and keep the environment cozy—you’ve got this! For extra confidence, check out our hibiscus care guide next to ensure your seedlings thrive into healthy plants.