Lawn
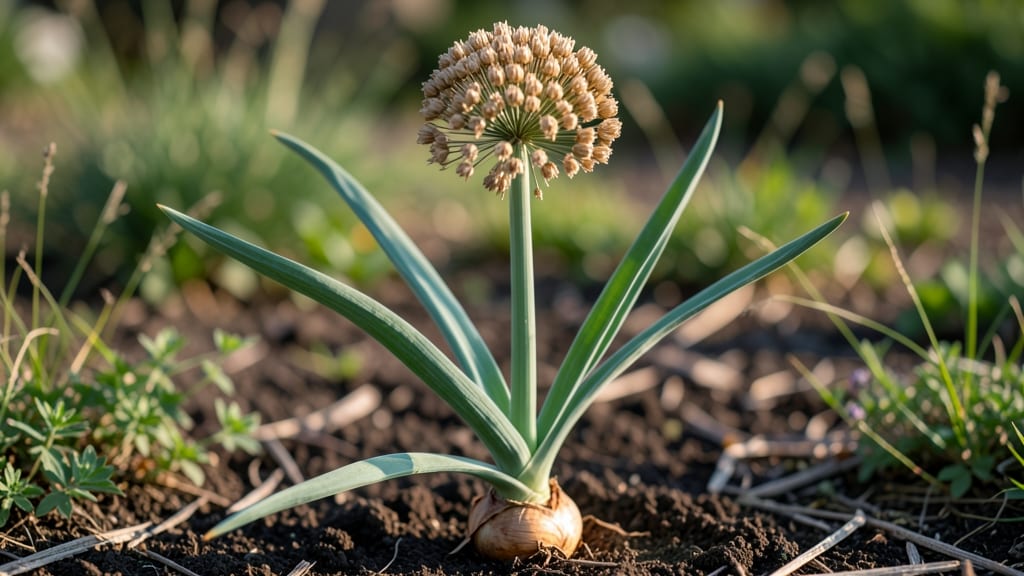
Twisting open onion seed pods reveals tiny black treasures that could grow your next crop. 🌱 I learned the hard way that patience is key—those papery pods need perfect timing to release viable seeds, and rushing means wasted effort.
The first time I harvested too early, I ended up with shriveled seeds that wouldn't germinate, but now I know exactly when to act.
Start by spotting the seed heads turning from green to a papery brown—this means they're ready. Use clean scissors to snip the stems, leaving a little extra length to hang them upside down in a dry, dark place.
Within 2-3 weeks, those pods will pop open on their own, releasing plump, dark seeds that store beautifully for years. The key is letting nature do the work without interference.
Once dried, store seeds in an airtight container in a cool, dark spot where they'll stay viable for 3-4 years. When planting time comes, scatter them directly into prepared soil in early spring or late summer, just like you would onion sets—but these homegrown varieties often outperform store-bought ones.
The first green shoots appear in 10-14 days, and you'll know you've done it right.
This method works for all onion varieties, from sweet shallots to hardneck types, and gives you complete control over what grows in your garden. No more guessing at the grocery store—just pure, homegrown flavor straight from your own seed pods.
📚 In This Guide
- What you need
- Instructions
- Tips and common mistakes
- Wrapping up and next steps
What you need
- ● Onion seed pods: Choose Allium cepa (common onion) or ornamental varieties like Allium giganteum. Buy seeds from a reputable supplier (e.g., blank">Baker Creek Heirloom Seeds or blank">Burpee). Quantity: 1–2 packets (enough for 20–50 plants).
- ○ Well-draining soil: Mix potting soil with perlite or coarse sand (ratio: 3 parts soil to 1 part perlite). Optional: Add compost for extra nutrients.
- ● Containers or garden bed: For seedlings: 3–4" deep pots (1–2 per seed pod) or seed trays.
- ● For transplanting: Garden bed with full sun (6+ hours/day) or large containers (12"+ depth).
- ● Watering can or spray bottle: Fine mist setting for seeds; gentle watering for mature plants.
- ○ Fertilizer (optional but helpful): Balanced fertilizer: 10-10-10 or 5-5-5 (follow package rates).
- ● Organic option: Fish emulsion or worm castings.
- ● Hand trowel or planting dibber: For gentle seed placement (1/4" deep).
- ○ Gloves (optional): Protect hands from soil or sharp onion skins.
- ● Row covers or mesh: Lightweight fabric to deter pests (e.g., flea beetles) during early growth.
- ● Pruning shears: For harvesting mature seed pods (when they turn papery and dry).
- ● Labels & markers: To track varieties and planting dates.
- ● Timing: Plant seeds indoors 8–10 weeks before last frost or directly outdoors in spring (after soil reaches 50°F+).
- ● Patience: Seed pods take 120–150 days to mature and pop open naturally!
- ● Sunlight check: Ensure your garden spot gets full sun (6+ hours/day).
- ● Weather prep: Avoid planting during extreme heat or drought.
How to grow onion seed pods for natural seed harvesting
Here's how to coax those iconic onion seed pods to open naturally—no twisting required.
🌱 Step 1: Start with Healthy Onion Plants
Choose mature onion plants that have fully formed flower stalks but haven't yet bloomed. Look for sturdy stems with vibrant green leaves—these indicate plants with enough energy to produce seed pods. I always pick varieties like 'Red Baron' or 'Stuttgarter' because they reliably develop those twist-resistant seed pods.
Remove any damaged or yellowing leaves before flowering begins. This ensures the plant directs all its energy toward seed production rather than repairing damaged foliage. Water deeply 2-3 days before you expect the first flowers to open, which helps the plant store moisture for the seed development process.
☀️ Step 2: Provide Ideal Conditions for Flowering
Onion seed pods thrive in full sun (6-8 hours daily) and temperatures between 65-75°F. If your climate runs hotter, provide afternoon shade to prevent flower stalks from bolting too quickly. I've found that a lightweight row cover works well for afternoon protection without blocking airflow.
Reduce watering once flowers appear—aim for 1 inch per week instead of the 1.5 inches onions need during bulb formation. This slight drought stress actually encourages stronger seed pod development. Watch for the first flower buds to swell; that's your signal to cut back on irrigation.
🌿 Step 3: Let Seed Pods Mature Naturally
Once the flowers open and pollinate, the seed pods will form. Here's the key: do not disturb them. Unlike many vegetables, onion seed pods won't split open when handled—they need to dry naturally on the plant. Leave them attached until they turn from green to tan and begin cracking open on their own.
I wait until about 70% of the pods have turned brown before harvesting. You'll know they're ready when you see small seeds rattling inside the pods. If you harvest too early, the seeds won't be fully developed. If you wait too long, they may scatter on their own—so keep an eye on them during dry, windy days.
⏰ Step 4: Harvest and Store Seeds Properly
When the pods are ready, gently twist them off the stem by hand. You don't need to force them—they should come away easily once mature. Place the pods in a paper bag and leave them in a dry, warm spot for 1-2 weeks to complete drying. This final drying period ensures maximum seed viability.
Once completely dry, crush the pods between your fingers to release the seeds. Sift through the debris to collect the clean seeds, then store them in a sealed envelope in a cool, dark place. Properly stored onion seeds remain viable for 2-3 years, though I've had best germination with seeds used within the first year.
💧 Step 5: Maintain Plant Health Through Seed Production
Continue watering lightly throughout the seed production phase—just enough to keep the soil from drying out completely. I water at the base of the plant rather than overhead to prevent fungal diseases that can attack the delicate seed pods. Fertilize lightly with a balanced organic fertilizer every 4-6 weeks to maintain plant vigor.
Watch for pests like onion thrips or aphids, which can damage developing seed pods. If you spot any, treat with neem oil or insecticidal soap immediately. A healthy plant will produce more robust seed pods, and that means better seed quality for next season's planting.
Tips & tricks for perfect onion seed pod harvesting
A few key insights that'll help you coax those stubborn seed pods to open naturally without frustration.
Variety Matters: Stick with reliable seed pod producers like 'Red Baron' or 'Stuttgarter' varieties—they're specifically bred for those twist-resistant pods that pop open naturally. I've tried other varieties and found they often require more force to release seeds, making the whole process less satisfying.
Timing is Everything: That 2-3 day deep watering before flowering is crucial—it primes the plant for seed production. I've learned this the hard way after watching plants struggle when I skipped this step. The extra moisture helps the plant store energy for the demanding seed development process that follows.
Patience Pays Off: When waiting for 70% of pods to turn brown, resist the urge to harvest early. I've rushed this step twice and ended up with underdeveloped seeds that wouldn't germinate. The rattling sound inside the pods is your true indicator of readiness, not just the color change.
Storage Wisdom: The 1-2 week final drying period in a paper bag is where many gardeners cut corners. I've seen seeds lose viability when skipped—those extra days ensure maximum germination rates. Store seeds in sealed envelopes in a cool, dark place to maintain their viability for up to 3 years.
Pro Tips for Onion Seed Pods
- A few key insights that'll help you coax those stubborn seed pods to open naturally without frustration.
- Variety Matters: Stick with reliable seed pod producers like 'Red Baron' or 'Stuttgarter' varieties—they're specifically bred for those twist-resistant pods that pop open naturally.
- Timing is Everything: That 2-3 day deep watering before flowering is crucial—it primes the plant for seed production.
Frequently asked questions
Got questions about onion seed pods? You’re not alone! Here are some of the most common queries—plus quick, practical answers to help you grow like a pro.
What do onion seed pods look like, and how do I know they’re ready to harvest?
Onion seed pods resemble tiny, papery balls that form at the top of flowering stalks. When fully mature, they’ll turn brown and pop open on their own—no twisting required! Harvest them when they’re dry but still intact (usually 6–8 weeks after flowering). If they’re still green, leave them a few more days.
How long does it take for onion seed pods to mature after flowering?
After onions flower, seed pods typically take 4–6 weeks to mature, depending on your climate and variety. In cooler regions, this can stretch to 6–8 weeks. Watch for the pods to dry out and split open naturally—this is your cue to collect them!
Can I save onion seed pods from store-bought onions, or do I need to grow them myself?
Nope! Store-bought onions are often hybridized or treated to prevent bolting (flowering), so their seed pods won’t form. For reliable seed pods, you’ll need to grow onions from seed or sets (small onion bulbs) in your garden. Choose varieties labeled as "open-pollinated" for the best results.
What should I do if my onion seed pods won’t open naturally?
If pods stay closed, they’re likely not fully dry. Try these fixes:
- Harvest early and dry them indoors on a paper towel for 1–2 weeks.
- Gently squeeze the pods—if they’re brittle, they’ll crack open.
- Check for pests (like aphids) that may have damaged the pods.
Are onion seed pods safe to eat, or are they just for planting?
While the pods themselves aren’t edible, the flowers (before they form pods) are! They’re mild, onion-y, and perfect for garnishes or salads. Just avoid the pods—they’re tough and bitter. Save them for growing next year’s onions instead!
Wrapping up and next steps
Growing onion seed pods is a rewarding way to add beauty and resilience to your lawn or garden—without the fuss of traditional blooms! 🌱 These twist-resistant pods not only thrive on their own but also attract pollinators while keeping pests at bay.
Whether you're a seasoned gardener or just starting out, their low-maintenance charm makes them a perfect addition to any outdoor space.
Ready to pop your garden with these unique blooms? Grab your supplies, follow the steps, and watch your lawn transform into a vibrant, self-sustaining oasis. Happy planting—your future garden will thank you! 🌟