Propagation
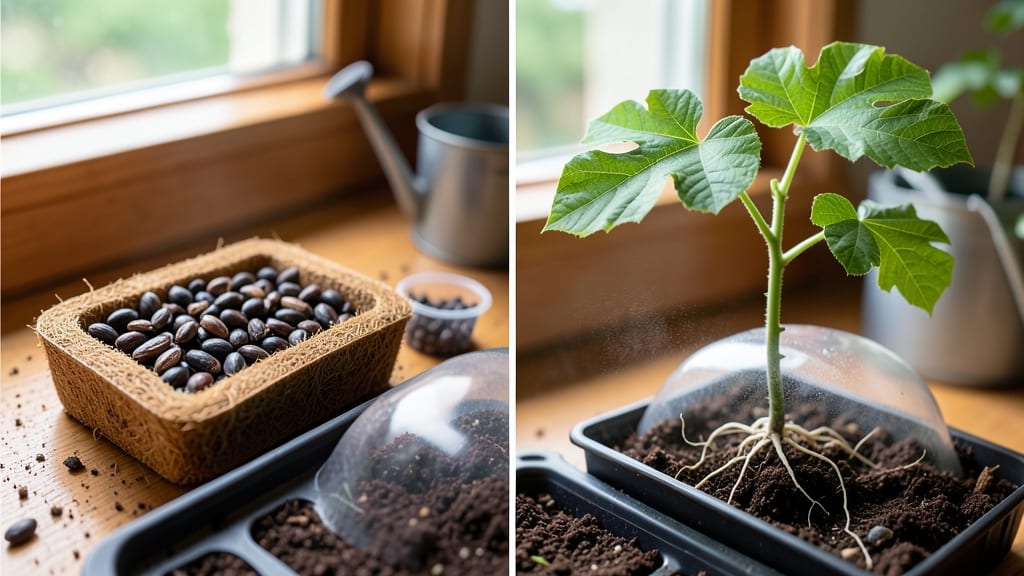
Fast papaya seed germination starts with a simple trick: skip the twist and let nature do the work. 🌱 The no-twist pod technique cuts germination time from weeks to just 7-10 days by preserving seed viability—no fancy equipment needed, just patience and the right conditions.
Begin with fresh seeds from a ripe papaya (save them within 24 hours of cutting open the fruit). Soak them for 12 hours in warm water to soften the shell, then plant ½ inch deep in a moist, well-draining mix of peat and perlite.
Keep the soil consistently damp but never soggy—papaya seeds rot faster than they sprout if overwatered.
Place your container in a warm spot (80-85°F) with bright, indirect light. A heat mat helps speed things up, but even a sunny windowsill works if you’re patient.
Within 5-7 days, you’ll see tiny white roots pushing through the soil—this is your cue to move them to individual pots.
Troubleshooting is simple: if seeds don’t sprout in two weeks, they may be old or dried out. Try soaking a fresh batch or check your soil temperature—papaya seeds won’t germinate below 70°F.
Once they’re up, give them 6+ hours of light daily to prevent leggy growth. Fast results start here.
📚 In This Guide
- What you need
- Instructions
- Tips and common mistakes
- Wrapping up and next steps
What you need
- ● Papaya seeds: 5–10 fresh, plump seeds (harvested from a ripe papaya—save them within 24 hours for best results).
- ● Germination pod: A small, breathable container (e.g., a 6-inch plastic or coconut fiber pot with drainage holes).
- ● Germination medium: Option 1: Coconut coir (sterilized, 100% fiber, no additives).
- ● Option 2: Peat moss + perlite mix (70% peat, 30% perlite, moisture-retentive but well-draining).
- ● Spray bottle: A 16-oz misting bottle (for gentle hydration).
- ● Plastic wrap or humidity dome: Clear plastic wrap or a small propagator lid to retain moisture.
- ○ Heating mat (optional but recommended): A seedling heat mat (set to 80–85°F) for faster germination.
- ● Scissors or knife: For cutting plastic wrap (if using).
- ● Tweezers: To handle small seeds gently.
- ○ Thermometer (optional): A digital soil thermometer to monitor heat levels.
- ○ Grow lights (optional): A full-spectrum LED bulb (12–16 hrs/day) once sprouts emerge.
- ● Fertilizer (post-germination): Diluted fish emulsion (1:10 ratio) or balanced 10-10-10 fertilizer.
Step-by-step instructions for papaya seed germination
Here's how to bypass the tricky twist-and-pull method for a faster, more reliable start.
🌱 Step 1: Extract Seeds Without Damaging the Pod
Papaya seeds need to be removed carefully to avoid crushing the delicate seed coat. Cut open a ripe papaya lengthwise and scoop out the gelatinous seed mass. Place it in a bowl of warm water to dissolve the mucilage—this makes seeds easier to separate without damaging their protective coating.
Once the gooey layer dissolves (about 15-20 minutes), gently swirl the water to release individual seeds. Use a fine-mesh strainer to collect them, then rinse thoroughly under running water to remove all residue. The seeds should look plump and intact—any shriveled or cracked ones won't germinate. Here's the thing: don't skip the rinse. Leftover mucilage can slow down or prevent germination entirely.
💧 Step 2: Prepare the Germination Medium
Fill a shallow container with a mix of 50% perlite and 50% peat moss—this lightweight blend prevents rot while retaining enough moisture. Moisten it until damp but not soggy; you should feel slight resistance when squeezing a handful. The medium needs to stay consistently moist during germination, but never waterlogged.
Spread the seeds about ½ inch apart on the surface, pressing them lightly into the medium. Cover the container with plastic wrap or a humidity dome to create a greenhouse effect. Place it in a warm spot—80-85°F is ideal—like on top of a refrigerator or near a heat mat. You'll see tiny sprouts in just 3-5 days if conditions are right.
☀️ Step 3: Provide Warmth and Indirect Light
Germination happens fastest in warmth, but direct sunlight isn't needed yet. Keep the container in a spot with bright, indirect light—like a south-facing window with a sheer curtain. If your home runs cooler, consider using a seedling heat mat to maintain 75°F+ soil temperature. Watch for condensation on the plastic; if it's heavy, lift the cover for 10 minutes daily to prevent mold.
Once the first true leaves appear (not the initial seed leaves), remove the cover completely. This is the moment that matters: seedlings will start photosynthesizing on their own. You'll notice them growing taller and developing a sturdier stem within 7-10 days after germination. At this stage, move them to a slightly brighter spot, but avoid harsh midday sun.
🪴 Step 4: Transplant into Individual Pots
When seedlings reach about 3-4 inches tall and have developed 3-4 true leaves, it's time to transplant. Fill 3-inch pots with a well-draining potting mix—papayas hate soggy roots. Gently remove each seedling, keeping the root ball intact, and place it in its own pot. Press the soil lightly around the base to eliminate air pockets.
Water thoroughly but don't let the soil stay soggy. Papayas are tropical plants and need consistent moisture, but they'll rot if their roots sit in water. After transplanting, place the pots in a warm, bright spot with 6-8 hours of indirect sunlight daily. You'll see new growth within a week—that's your signal everything is working.
⏰ Step 5: Harden Off Before Outdoor Transition
Two weeks before your last frost date, begin hardening off the seedlings. Start by placing them outside in a sheltered, shaded spot for 1 hour daily. Gradually increase their outdoor time by 1 hour each day until they can tolerate a full day outside. This process should take about 10-14 days and prepares them for the transition to a garden or larger container.
Real talk: papayas are sensitive to cold. If you're in a cooler climate, wait until nighttime temperatures stay above 55°F before planting outdoors. Once hardened off, your seedlings will be ready to thrive in a sunny, tropical environment. Keep an eye out for pests during this transition—aphids love young papaya plants.
Tips & tricks for perfect papaya seed germination
Here's what nobody tells you about getting those seeds to sprout reliably—and fast.
Seed Selection: Choose seeds from fully ripe papayas with vibrant orange flesh. The riper the fruit, the more mature and viable the seeds will be. I've found that seeds from organic papayas often germinate faster—likely due to fewer chemical residues. Store seeds in a paper towel in the fridge between uses, but don't let them dry out completely before planting.
Medium Consistency: That 50/50 perlite-peat moss mix needs to feel like a wrung-out sponge—not dripping wet, not bone dry. I test it by squeezing a handful: water should barely bead on my fingers. Too wet and you risk rot; too dry and germination slows dramatically. For extra insurance, I add a thin layer of horticultural sand on top of the medium—it helps prevent fungal growth while maintaining airflow.
Warmth Strategy: If your home hovers below 75°F, don't rely on ambient warmth. Place your germination container on top of a refrigerator (not inside—you want heat, not cold!) or use a seedling heat mat set to maintain 75°F+. I've seen germination times cut in half when using this method. Pro tip: Check the underside of the container for condensation daily—if it's heavy, lift the plastic cover for 10 minutes to prevent mold.
Transplant Timing: Wait until you see those first true leaves (not the initial seed leaves) before removing the cover completely. This is when the seedlings start photosynthesizing on their own. I've noticed they grow noticeably taller within 7-10 days after germination if given bright, indirect light at this stage. For the transplant step, use pots with drainage holes—papayas hate soggy roots, and this prevents the root rot that can kill seedlings overnight.
Pro Tips for Papaya Seed Germination
- Here's what nobody tells you about getting those seeds to sprout reliably—and fast.
- Seed Selection: Choose seeds from fully ripe papayas with vibrant orange flesh.
- Medium Consistency: That 50/50 perlite-peat moss mix needs to feel like a wrung-out sponge—not dripping wet, not bone dry.
Frequently asked questions
Got questions about papaya seed germination?
You’re not alone! Here are answers to the most common queries to help you grow your own papaya plants with confidence.
How long does it take for papaya seeds to germinate?
With the no-twist pod technique, germination typically takes 7–14 days under ideal conditions (warmth, moisture, and indirect light). Some seeds may sprout faster—even in 3–5 days—while others take longer. Patience is key! Keep the soil consistently damp (not soggy) and maintain temps above 70°F (21°C) for best results.
Can I germinate papaya seeds without using the no-twist pod method?
If you don’t have a pod, try the paper towel method: Place seeds between damp paper towels in a sealed plastic bag, then transfer sprouted seeds to soil. Alternatively, plant seeds directly in moist, well-draining potting mix (about ½ inch deep) and cover lightly with soil. Just ensure warmth and humidity to mimic tropical conditions.
Why aren’t my papaya seeds germinating? Troubleshooting tips.
If your seeds aren’t sprouting, check these common issues:
- Cold temps: Papaya seeds need warmth—move your setup to a sunny windowsill or use a seedling heat mat.
- Dry soil: Keep the soil or paper towel consistently moist (not waterlogged).
- Old seeds: Fresh seeds germinate faster. If yours are dried out, soak them in warm water for 24 hours before planting.
- Low humidity: Cover the pod or tray with plastic wrap to trap moisture until sprouts appear.
If nothing works, test a few seeds in warm water—if they float, they’re likely non-viable.
How do I know if a papaya seedling is healthy?
A healthy papaya seedling should have:
- Two strong cotyledons (the first leaves) that are vibrant green.
- No yellowing or wilting—these signs indicate overwatering or poor drainage.
- A sturdy stem (not leggy or weak).
Once true leaves (small, serrated) appear, it’s ready for transplanting. Avoid direct sunlight at first to prevent stress!
Can I grow papaya from store-bought seeds, or do I need heirloom seeds?
You can absolutely use seeds from store-bought papayas—just note that hybrid varieties (like those from grocery stores) may not produce fruit identical to the parent plant. For guaranteed fruit quality, opt for heirloom or seed-saved papaya varieties from nurseries or seed banks. If you’re experimenting, store-bought seeds are a fun, budget-friendly way to start!
Wrapping up and next steps
Germinating papaya seeds with the no-twist pod technique is a rewarding and efficient way to grow your own tropical fruit tree—without the fuss! By keeping it simple with the right moisture, warmth, and patience, you’ll soon witness those tiny sprouts breaking through. 🌱
Now that you’re armed with the know-how, give it a try! Start with just a few seeds, experiment with your setup, and watch your green thumb grow. Before you know it, you’ll be harvesting sweet, ripe papayas straight from your backyard. Happy growing! 🌿