
Lawn
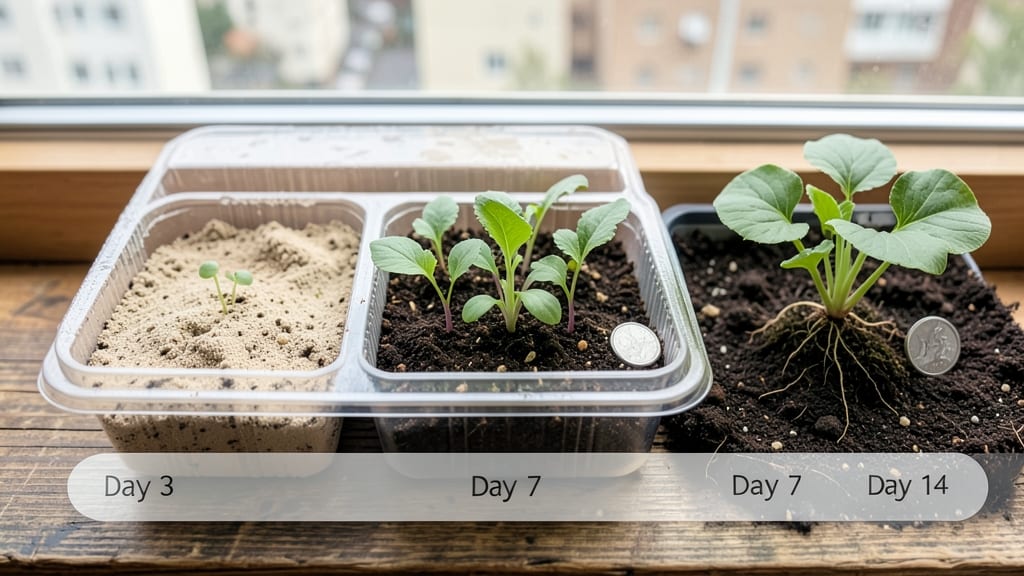
The first crack in the seed coat is where the magic begins. 🌱 Understanding the seed stages of growth helps you know exactly when to adjust moisture, light, and warmth—because each tiny milestone demands something different to keep your seedlings thriving.
You’ll watch the radicle (that first white root) break through the shell within 3-10 days, followed by the hypocotyl (the stem) pushing upward like a tiny green arrow.
This stage lasts 2-5 days, and keeping soil consistently moist—never soggy—is the secret to success. Too dry? The seedling stalls. Too wet? It rots before it grows.
Next comes the cotyledon stage, where those first true leaves unfurl—7-14 days after planting—marking the moment your seedling is ready for brighter light. This is when you’ll see real growth: sturdy stems, vibrant foliage, and the confidence that your hard work is paying off.
For beginners, timing can feel like a guessing game, but these milestones make it simple. Advanced gardeners will notice how temperature tweaks (like a heat mat for slower seeds) or light adjustments (like moving seedlings closer to a window) can shave days off the process.
Every stage builds on the last—so let’s get growing!
📚 In This Guide
- What you need
- Instructions
- Tips and common mistakes
- Wrapping up and next steps
What you need
- ● Lawn seed: Choose high-quality, fast-germinating grass seed (e.g., Kentucky Bluegrass, Tall Fescue, or Ryegrass). Quantity: 5–10 lbs per 1,000 sq. ft. (check seed bag for coverage rates).
- ● Soil: Loose, well-draining topsoil or a seed-starting mix (avoid heavy clay). Quantity: Enough to cover 1–2 inches over seeds.
- ● Compost or fertilizer: A balanced, low-nitrogen starter fertilizer (e.g., 10-10-10 or 5-10-10). Quantity: Follow package instructions (typically ½–1 lb per 100 sq. ft.).
- ● Water: A gentle watering system (hose with a fine nozzle or sprinkler).
- ● Broadcast spreader: For even seed distribution (manual or drop-type).
- ● Rake: A plastic or metal garden rake with fine teeth to level soil and cover seeds lightly.
- ○ Lawn roller (optional): A lightweight roller (100–150 lbs) to press seeds into soil for better contact.
- ○ Soil tester kit (optional):strong> To check pH and nutrient levels (ideal pH: 6.0–7.0 for most grasses).
- ○ Mulching fabric (optional):strong> Biodegradable straw or jute netting to retain moisture and protect seeds from birds.
- ● Weather: Plant seeds during cool, damp conditions (spring or fall). Avoid extreme heat or frost.
- ● Preparation: Clear debris, loosen soil, and level the area before seeding.
- ● Consistency: Commit to daily watering (lightly, 2–3 times/day) until seeds germinate (typically 7–21 days).
Visual guide to recognizing seed germination stages
Every gardener’s first thrill comes when seeds break dormancy—here’s how to spot each milestone.
🌱 Step 1: Imbibition – The Silent Soaking
The moment you plant a seed, it begins absorbing water through its outer coating—a process called imbibition. You won’t see anything yet, but the seed swells as it activates enzymes to break down stored nutrients. This stage can take anywhere from a few hours to several days, depending on the seed type and moisture conditions. Think of it as the seed’s quiet preparation phase before the action begins.
To encourage this step, maintain consistent moisture in the soil or growing medium—never let it dry out completely. If you’re using a humidity dome, check it daily for condensation buildup, which signals the seed is actively absorbing water. This is also when temperature matters most: most seeds germinate best between 65-75°F, but some tropical varieties may need 80°F or warmer.
🌱 Step 2: Radicle Emergence – The First Visible Sign
The radicle—the embryonic root—is the first part of the seedling to break through the seed coat. You’ll spot it as a tiny white or translucent thread pushing downward into the soil. This stage typically occurs 3-10 days after planting, but some seeds (like peppers) can take up to 2 weeks. The radicle anchors the seedling and begins absorbing water and nutrients from the soil.
Here’s the thing—don’t be tempted to water heavily once you see this. Overwatering now can suffocate the delicate root or cause it to curve unnaturally. Instead, keep the soil evenly moist by misting lightly or using a spray bottle. You’ll know you’re doing it right when the soil surface stays slightly damp but doesn’t form puddles.
🌱 Step 3: Shoot Emergence – The Above-Ground Breakthrough
Next comes the shoot, or hypocotyl, which pushes upward through the soil. This is the moment you’ll actually see green appear—first as a small loop just beneath the surface, then as a tiny stem breaking through. The shoot carries the seed leaves (cotyledons) that will unfold to begin photosynthesis. This stage usually happens 5-14 days after the radicle emerges, but timing varies wildly by plant type.
Watch for the cotyledons to unfurl within 24-48 hours of the shoot emerging. These first leaves aren’t true leaves—they’re just energy storage units from the seed. Don’t confuse them with true leaves, which will appear later and look more complex. If the shoot emerges but the cotyledons don’t unfurl within a few days, the seedling may be struggling from poor light or temperature.
☀️ Step 4: True Leaves – The Growth Explosion
Once the cotyledons have done their job, the first true leaves will emerge—these are the ones that look like miniature versions of the mature plant’s foliage. This is when the seedling officially becomes a plant and begins rapid growth. True leaves signal it’s time to provide more light (12-16 hours daily) and nutrients, as the plant is now photosynthesizing on its own.
You’ll notice the stem thickens and the leaves develop veins and texture. This is also when you can start thinking about thinning seedlings if you overplanted. Real talk: If you see two seedlings competing in one cell, the weaker one will yellow and fall over—don’t wait for that to happen. Use small scissors to snip at soil level so you don’t disturb the stronger plant’s roots.
🌿 Step 5: Maturation – The Transition to Self-Sufficiency
The final stage is when the plant develops its mature leaf structure and begins producing flowers or edible parts (depending on the species). For vegetables like tomatoes or peppers, this is when you’ll see the first signs of buds forming. For herbs, it’s the point where leaves reach their full flavor. This stage can take 4-8 weeks after germination, depending on the plant.
Here’s where it gets fun—watch the plant’s growth rate and adjust care accordingly. If you’re growing edibles, you’ll start harvesting leaves or flowers soon after this stage. For ornamentals, this is when pruning and training begin to shape the plant’s structure. The key is consistency: maintain even moisture, rotate plants for balanced growth, and monitor for pests, which love tender new seedlings.
Tips & tricks for mastering seed germination stages
Understanding these subtle cues transforms guesswork into gardening confidence—here's how to optimize each phase.
Temperature Precision: The 65-75°F range isn't just a guideline—it's the biological sweet spot where most seeds activate their metabolic processes. For tropical varieties requiring 80°F+, consider using a seedling heat mat ($20-$30) beneath your growing trays. I've seen pepper seeds that took 14 days to sprout at room temperature germinate in just 5 days with the heat mat—it's a game-changer for impatient gardeners.
Moisture Monitoring: That condensation buildup on your humidity dome isn't just water vapor—it's visual proof your seeds are actively imbibing. Check it daily and wipe it away to prevent mold growth. Pro tip: Use a spray bottle with a fine mist setting to maintain consistent moisture without drowning delicate radicles. The soil should feel like a wrung-out sponge, not a swamp.
Light Timing: Those 12-16 hours of daily light aren't arbitrary—they mirror the photoperiod plants experience in nature. For indoor growers, use a simple LED grow light on a timer rather than natural light, which varies seasonally. Position it just 2-3 inches above seedlings to prevent leggy growth. I've seen seedlings stretch dramatically when lights were too far away, making them weak and prone to falling over.
Thinning Strategy: When you see two seedlings competing in one cell, don't hesitate—thin them immediately using small scissors. The key is to cut at soil level, not pull, to avoid disturbing the stronger plant's roots. I've learned this the hard way after watching seedlings yellow and die from root damage when pulled. Save the thinned seedlings for transplanting or composting—every seedling counts!
Pro Tips for Seed Stages Of Growth
- Understanding these subtle cues transforms guesswork into gardening confidence—here's how to optimize each phase.
- Temperature Precision: The 65-75°F range isn't just a guideline—it's the biological sweet spot where most seeds activ...
- Moisture Monitoring: That condensation buildup on your humidity dome isn't just water vapor—it's visual proof your se...
Frequently asked questions
Got questions about the early days of seed growth? You’re not alone!
Here are some of the most common queries—and straightforward answers—to help you navigate the seed stages of growth like a pro.
What do the seed stages of growth look like in a lawn?
The seed stages typically include imbibition (soaking up water), radicle emergence (the first root breaking through), shoot appearance (tiny green sprouts), and leaf development (1-3 leaves forming). Each stage varies by grass type—cool-season grasses sprout faster than warm-season varieties.
How long does it take for seeds to germinate?
Germination time depends on grass type, soil temperature, and moisture. Cool-season grasses (like fescue) sprout in 7–21 days, while warm-season grasses (like Bermuda) can take 10–30 days. Check your seed packet for specifics—patience is key!
What’s the best way to keep seeds moist during germination?
Use a light misting (not soaking) to keep soil consistently damp—like a wrung-out sponge. A mulch layer (straw or peat moss) helps retain moisture without smothering sprouts. Avoid heavy watering, which can wash seeds away or cause rot.
Why aren’t my seeds sprouting? Troubleshooting tips.
Common culprits: too dry or too cold soil, poor seed-to-soil contact, or old seeds. Test soil moisture with your finger—it should feel like a damp sponge. If seeds are older than a year, consider replanting.
Can I overseed an existing lawn during these stages?
Yes! Overseeding works best when your current lawn is thin or patchy. Scratch the soil lightly to expose seed, then cover with a thin layer of mulch. Just avoid overseeding right after germination—wait until new shoots are 1–2 inches tall for best results.
Wrapping up and next steps
Understanding the seed stages of growth is your first step toward a thriving lawn—every sprout begins with patience and the right care! 🌱 From dormancy to root development, each milestone sets the foundation for lush, healthy grass. Celebrate small wins: a single seedling breaking through soil is proof your efforts are working.
Now that you’re equipped with the how-to and why-it-matters, take the next logical step: plant your seeds and track progress with a journal or photos. Watch, learn, and adapt—your green thumb is just getting started!