
Lawn
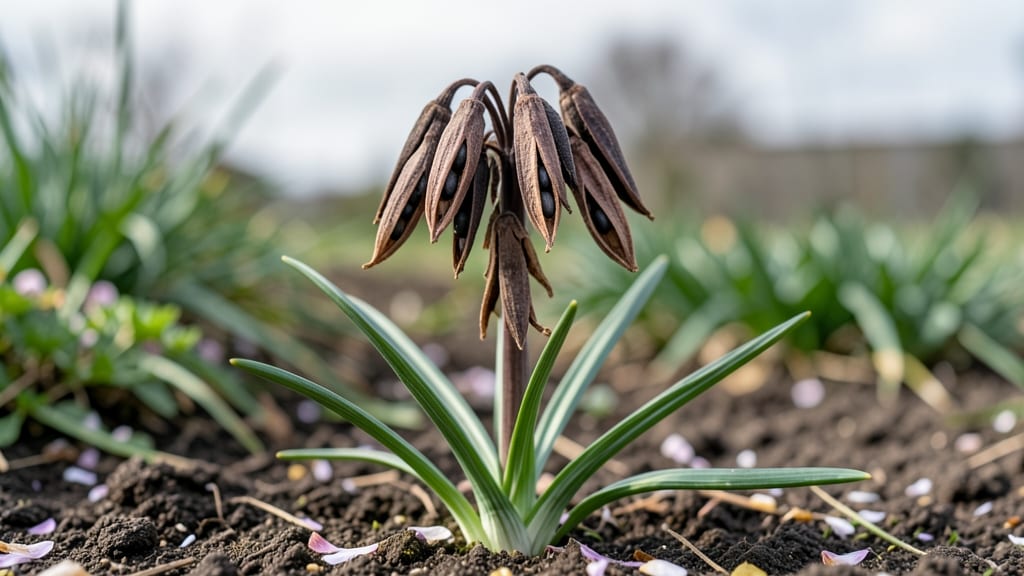
Struggling with crocus seed pods that refuse to open or produce viable seeds? 🌱 The secret to growing next year’s blooms starts with understanding why some pods stay stubbornly closed—and how to trick them into releasing seeds.
Most gardeners assume all crocus plants produce seeds, but hybrid varieties often skip this step entirely. Even if yours do form pods, improper storage or timing can turn them into empty husks before they’re ready. First, identify mature pods—they’ll turn brown and dry out completely, often by late summer.
Harvest them carefully with clean scissors, then let them dry in a paper bag for a week. If the pods resist opening, place them in a sealed bag with slightly damp sand and refrigerate for 6-8 weeks to mimic winter’s natural stratification.
This mimics the cold period seeds need to break dormancy, giving you a head start on spring growth. By spring, you’ll have fresh seeds ready to plant, or you can store them in the fridge for up to a year.
The key is patience—rushing the process leads to weak or nonviable seeds. Even if your first batch fails, you’ll learn what works for your climate and crocus varieties. This method works for garden crocus (Crocus vernus) and species types like Crocus tommasinianus, though hybrids may still disappoint.
Empty pods or moldy seeds? Don’t toss them out—examine the cause. Overripe pods or damp storage create mold, while pests like rodents or slugs can chew through them. If your pods stay closed, your plant might be a sterile hybrid.
In that case, divide established clumps in fall to propagate new plants instead. The good news? Once you master stratification, you’ll have a steady supply of seeds for years, cutting costs and expanding your garden effortlessly.
📚 In This Guide
- What you need
- Instructions
- Tips and common mistakes
- Wrapping up and next steps
What you need
- ● Crocus seed pods: 1–5 pods (depending on desired quantity; opt for organic or heirloom varieties for best results).
- ● Well-draining potting mix: 2–3 gallons (use a blend designed for bulbs or perennials, like a mix of peat moss, perlite, and compost).
- ● Small pots or containers: 4–6-inch diameter (one per seed pod or a shared tray with drainage holes).
- ● Plastic bag or airtight container: For stratification (a gallon-sized zip-top bag works perfectly).
- ● Refrigerator or cold frame: A space that maintains 35–45°F (2–7°C) for 8–12 weeks.
- ● Spray bottle: For gentle watering (avoid soaking the mix).
- ● Labeling tags: To track varieties and planting dates.
- ● Sterilized tweezers: For carefully placing tiny seeds (if extracting from pods).
- ● Humidity dome or clear lid: To create a mini greenhouse effect during germination.
- ● Grow lights: If starting indoors before the last frost (12–14 hours of light daily).
- ● Thermometer: To monitor cold stratification temps accurately.
- ● Garden journal: To log progress, moisture levels, and bloom predictions!
How to stratify crocus seed pods for spring blooms
These delicate pods need patience and the right conditions to break dormancy. Here's how to coax them into strong, flowering plants.
🌱 Step 1: Harvest and Clean the Seed Pods
Collect mature crocus seed pods when they turn brown and begin to split open naturally—usually late spring to early summer after the blooms have faded. Gently twist them from the stem and place them in a paper bag to dry indoors for 1-2 weeks in a warm, dry spot. This prevents mold while allowing seeds to fully mature.
Once dry, open the pods carefully with your fingers or a small knife. You'll find tiny, dark seeds inside—each pod typically contains 20-50 seeds. Remove any debris or empty husks. Store the clean seeds in a sealed envelope or small container until stratification begins.
💧 Step 2: Cold Stratify for Dormancy Break
Crocus seeds require 12-16 weeks of cold stratification to mimic winter conditions. Mix the seeds with a moistened potting mix in a small container—just enough to keep them covered but not submerged. Place the container in a plastic bag and seal it loosely to retain moisture.
Store the bag in your refrigerator's crisper drawer (or a similar 35-45°F spot) for 3-4 months. Check monthly to ensure the mix stays damp but not soggy. If you notice mold, remove the seeds immediately and restart with fresh mix. This cold treatment tricks the seeds into thinking winter has passed.
☀️ Step 3: Plant Stratified Seeds in Fall
After stratification, plant the seeds 8-10 weeks before your first frost date—usually late summer to early fall. Prepare a sunny garden bed with well-draining soil (crocus hates soggy roots). Scatter seeds ½ inch deep and 1 inch apart in rows or clusters. Lightly cover with soil and water gently to settle.
Mark the planting area with stakes or flags so you don’t disturb it over winter. The seeds will sprout late winter to early spring, but don’t be alarmed if you see nothing until March or April. Patience is key—these seeds are preparing for years of blooms ahead.
⏰ Step 4: Care for Seedlings Until Blooms Appear
Once seedlings emerge, they’ll grow slowly at first. Keep the soil evenly moist but avoid overwatering—crocus roots are shallow and sensitive. Thin seedlings to 3-4 inches apart once they reach 2-3 inches tall to prevent crowding. They’ll develop long, grass-like leaves before forming flower buds.
Fertilize lightly in early spring with a balanced 10-10-10 formula (½ teaspoon per plant). By their second year, you’ll see the first blooms—tiny but stunning purple, white, or yellow flowers that appear before spring bulbs. Mulch lightly in fall to protect emerging shoots from late frosts.
Tips & tricks for perfect crocus seed stratification
Here's the thing about crocus seeds—they're stubborn little things that need just the right coaxing. These tricks will help you avoid common pitfalls and get those blooms next spring.
Timing is Everything: Don't rush the drying process in Step 1. Those 1-2 weeks in a warm, dry spot are crucial for preventing mold while ensuring the seeds mature properly. I've seen people skip this and end up with seeds that either won't germinate or grow moldy. Place your paper bag in a spot with good airflow, like on top of your fridge, to speed up drying without risking moisture buildup.
Moisture Management: When mixing seeds with potting mix in Step 2, aim for "damp like a wrung-out sponge"—not dripping wet, not bone dry. The 35-45°F refrigerator temperature will slow moisture evaporation, but check monthly. If you see condensation on the bag, open it briefly to air out. Too much moisture leads to mold; too little means the seeds won't break dormancy properly. A spray bottle helps adjust moisture precisely.
Planting Precision: In Step 3, use a toothpick or pencil to make tiny holes for your seeds—it gives you better control than just scattering them on top. The ½ inch deep planting depth is critical: too shallow and they'll dry out; too deep and they may struggle to push through. Mark your planting spots with small flags or sticks so you don't accidentally disturb them when winter weather hits. Trust me, you'll forget where you planted them!
Winter Protection: For Step 4, consider adding a layer of straw mulch (about 2 inches) over your planted seeds after the first frost. This extra insulation helps protect emerging shoots from temperature swings. The mulch will naturally break down in spring, adding organic matter to your soil without smothering your delicate crocus plants. Just remember to pull it back slightly when you see new growth appear.
Pro Tips for Crocus Seed Pods
- Here's the thing about crocus seeds—they're stubborn little things that need just the right coaxing.
- Timing is Everything: Don't rush the drying process in Step 1.
- Moisture Management: When mixing seeds with potting mix in Step 2, aim for "damp like a wrung-out sponge"—not dripping wet, not bone dry.
Frequently asked questions
Got questions about working with crocus seed pods? You’re not alone! Here are answers to the most common queries to help you navigate this rewarding (but sometimes tricky) gardening process.
How do I know when crocus seed pods are ready to harvest?
Harvest seed pods when they turn brown and papery—usually 6–8 weeks after blooming. Gently twist or snip them off the stem (avoid green pods, as they won’t store well). Let them dry in a paper bag for 1–2 weeks in a warm, dry spot before opening. Pro tip: Harvest on a dry day to prevent mold!
Do crocus seed pods need cold stratification, and how long?
Yes! Cold stratification mimics winter and boosts germination. Place dried seeds in a moist paper towel inside a sealed plastic bag, then refrigerate for 4–6 weeks (or until spring planting). Some gardeners skip this step, but stratification doubles your chances of success.
Can I use crocus seed pods from my garden, or should I buy them?
You can use homegrown pods, but results vary. Store-bought seeds are guaranteed fresh and often hybridized for better blooms. If using wild-collected pods, test a few—some may not grow true to the parent plant. Bonus: Buying seeds supports rare varieties!
What if my crocus seeds don’t sprout after planting?
Patience is key! Crocus seeds are slow—germination can take 3–6 months. If nothing emerges after a year, try these fixes:
- Check soil moisture (keep it consistently damp, not soggy).
- Ensure seeds were fresh (old seeds may fail).
- Plant shallower (¼ inch deep) for better light exposure.
Can I grow crocus seed pods indoors for early blooms?
Start seeds indoors in well-draining pots 8–10 weeks before your last frost date. Use a seed-starting mix, keep soil cool (60–65°F), and provide bright light (a grow bulb helps). Transplant outdoors after stratification. Warning: Crocus seedlings are delicate—harden them off gradually!
Wrapping up and next steps
Crocus seed pods are your ticket to a vibrant spring garden—just with a little patience and know-how! By mastering the art of stratification, you’re not only ensuring those cheerful blooms next year but also embracing a rewarding, hands-on gardening ritual. 🌱
Ready to dive in? Grab those pods, follow the steps, and soon you’ll be the proud gardener behind a carpet of color. Start small, experiment, and enjoy the process! Happy planting! 🌸