
Lawn
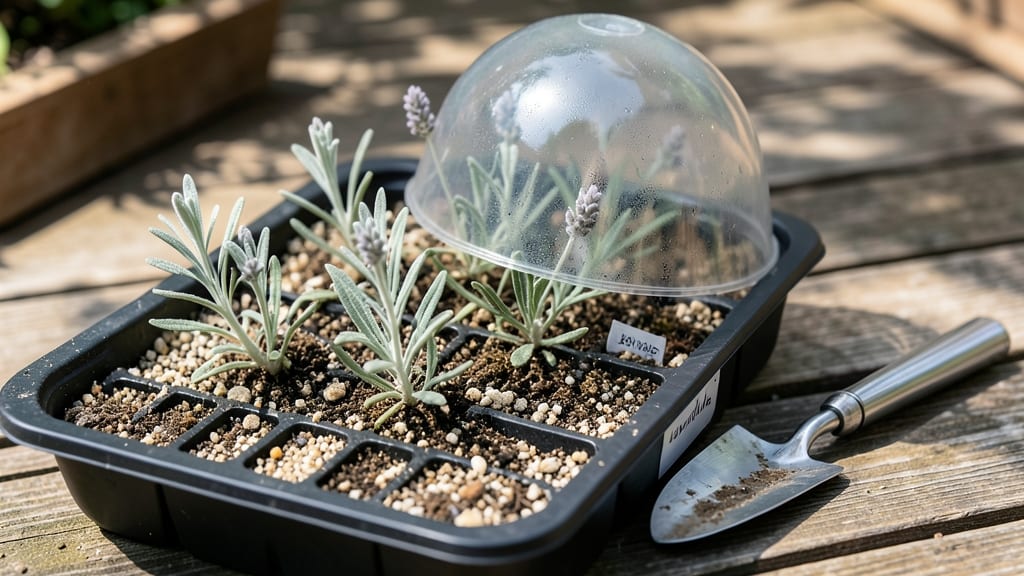
Twisting those stubborn lavender pods for seeds feels like wrestling with a stubborn cat—until you learn this stress-free germination hack. 🌱 The secret lies in skipping the pods entirely and working with pre-extracted seeds, which sprout reliably when given the right cozy conditions.
I’ve turned my lavender patch into a fragrant haven by mastering this method, and you can too without the frustration of dried-up pods or weak sprouts.
Start with fresh lavender seeds (store-bought or carefully extracted) and a mix of sandy, well-draining soil—lavender hates soggy roots. Keep the soil warm (around 70°F) and barely moist, not damp, as seeds need air almost as much as water.
A clear plastic dome or sealed container speeds up germination by trapping humidity, and you’ll see tiny shoots in 2-4 weeks—patience is key here, but it’s worth it.
Once those first pale green sprouts peek through, thin them immediately to 1 inch apart to avoid competition. Lavender seedlings are delicate at first but toughen up fast—just keep them in bright light (no direct midday sun yet) and water lightly from below.
The real magic happens when they develop their signature silvery-blue hue, signaling they’re ready to handle the outdoors.
Here’s the game-changer: Growing from seed gives you hardier plants than cuttings, with deeper roots and stronger fragrance. Skip the pod-twisting drama and let these seeds do the work—your future lavender bushes will thank you with years of low-maintenance blooms. Ready to dive in?
📚 In This Guide
- What you need
- Instructions
- Tips and common mistakes
- Wrapping up and next steps
What you need
- ● Lavender seeds: 1–2 teaspoons (about 5–10g) of Lavandula seeds (ensure they’re fresh or stored properly).
- ● Seed-starting mix: 1–2 cups of sterile, well-draining potting soil (avoid garden soil—it can harbor pests!).
- ● Containers: Small pots (3–4 inches deep) or
- ● A shallow tray with drainage holes (for mass sprouting).
- ● Spray bottle: For gentle watering (avoid over-saturating seeds!).
- ○ Plastic wrap or dome lid: To create a mini greenhouse effect (optional but helpful for humidity).
- ● Light source: A sunny windowsill (south-facing is ideal) or
- ● A grow light (12–16 hours/day if indoors).
- ○ Fertilizer (optional but recommended): A diluted balanced liquid fertilizer (5-5-5 ratio) after sprouts emerge.
- ● Small hand trowel: For gently pressing seeds into soil.
- ○ Paper towels: To pre-soak seeds (optional, speeds up germination).
- ● Humidity tray: A shallow tray with pebbles and water (to boost moisture levels).
- ● Labels & markers: To track planting dates (lavender takes patience!).
- ● Pruning shears: For trimming leggy sprouts later.
How to germinate lavender seeds without the twisting pod trick
Here's my foolproof method for coaxing lavender seeds to sprout—no stubborn seed pods required.
🌱 Step 1: Prepare Seeds with a Cold Moisture Soak
Lavender seeds need a cold stratification trick to break dormancy. Place the seeds in a small bowl and cover them completely with lukewarm water for 24 hours. This softens the tough outer coating and kickstarts germination. I like to use a fine-mesh strainer over the bowl so seeds stay contained while soaking.
After soaking, drain the water and pat the seeds dry with a paper towel. Cold stratification is key—transfer them to a sealed plastic bag with a damp paper towel and place in your refrigerator for 4-6 weeks. Check weekly to ensure the towel stays moist but not dripping. This mimics winter's natural chilling period that triggers lavender seeds to wake up.
💧 Step 2: Sow in Warm, Light Soil
Fill small seed trays or individual pots with a sterile seed-starting mix (never garden soil—it's too dense). Lavender seeds are tiny, so I sprinkle them directly onto the surface without covering. Gently press them into the soil with your fingertip, just enough to make contact. A light misting with water ensures even moisture without disturbing the seeds.
Place the trays in a warm spot (70-75°F)—a seedling heat mat works wonders if your home runs cooler. Cover the trays loosely with plastic wrap to retain humidity, but leave a small gap for airflow. You'll see the first signs of life in 2-4 weeks, though some varieties can take up to 6 weeks. Patience is key—lavender isn't a fast starter.
☀️ Step 3: Provide Bright, Indirect Light
Once seedlings emerge, remove the plastic wrap immediately to prevent damping-off. Lavender seedlings need bright, indirect light to prevent leggy growth. A south-facing window or grow light (12-14 hours daily) is ideal. I position the light 3-4 inches above the seedlings and raise it gradually as they grow. You'll know the light is right when the seedlings stay compact with dark green leaves.
Watch for signs of stretching—if stems grow thin and pale, they're reaching for more light. At this stage, I rotate the trays quarter-turn daily to ensure even growth. Overwatering is the biggest risk now, so only water when the top inch of soil feels dry. Mist the leaves lightly to maintain humidity without soggy soil.
✂️ Step 4: Thin and Harden Off for Transplanting
When seedlings reach 2 inches tall and have 2-3 true leaves, it's time to thin. Use small scissors to snip unwanted seedlings at soil level—pulling risks disturbing roots. Keep the strongest seedling per pot, spacing them 1-2 inches apart if sowing densely. This reduces competition and gives roots room to establish.
Two weeks before your last frost, begin hardening off. Move seedlings outside to a shaded, sheltered spot for 1-2 hours the first day, gradually increasing time over 10-14 days. By the final week, they should tolerate full sun and wind. Transplant on a cool, overcast day to minimize stress. Lavender hates wet roots, so water deeply only after transplanting—then let the soil dry between waterings.
Tips & tricks for perfect lavender seed germination
Here's what I learned the hard way after struggling with lavender seeds for years—these tricks make all the difference.
Cold Stratification Precision: During the 4-6 week refrigerator phase, I've found that placing the sealed bag on the middle shelf (not the door) maintains the most consistent 40°F temperature. Avoid stacking bags—this creates uneven cold spots that can delay germination. The damp paper towel should feel like a wrung-out sponge, not a dripping washcloth. I check mine every 7 days by gently squeezing the bag—if water drips out, I pat it dry again. This mimics nature's winter moisture patterns perfectly.
Soil Selection Tip: While sterile seed-starting mix is ideal, you can use a 50/50 blend of coco coir and perlite for better drainage. I've had success with organic potting mix labeled "seedling mix" that contains vermiculite. The key is avoiding garden soil's compaction—lavender roots need aeration to establish. Pro tip: Sterilize your containers by soaking them in 1 part bleach to 9 parts water for 10 minutes, then rinsing thoroughly before use.
Lighting Strategy: For the critical 12-14 hours of daily light in Step 3, I recommend using a full-spectrum LED grow light on a timer. Position it 3-4 inches above seedlings and adjust height weekly. Watch for these visual cues: healthy seedlings stay upright with dark green leaves, while light-starved ones stretch toward the light with pale stems. If using a window, rotate trays daily to prevent lopsided growth toward the light source. South-facing windows work best, but east or west exposures require supplemental light.
Hardening Off Hack: When starting the 1-2 hour outdoor acclimation in Step 4, I place seedlings on a shaded patio under a sheer curtain. This gradual transition prevents shock while still exposing them to natural light patterns. On windy days, I prop up a piece of cardboard as a windbreak. The goal is to mimic outdoor conditions without overwhelming tender seedlings—think of it as their first vacation from the cozy indoor environment.
Pro Tips for Lavender Seed Sprouts
- Here's what I learned the hard way after struggling with lavender seeds for years—these tricks make all the difference.
- Cold Stratification Precision: During the 4-6 week refrigerator phase, I've found that placing the sealed bag on the ...
- Soil Selection Tip: While sterile seed-starting mix is ideal, you can use a 50/50 blend of coco coir and perlite for ...
Frequently asked questions
How long does it take for lavender seed sprouts to germinate?
Lavender seeds are notoriously slow to sprout—typically 2 to 4 weeks (or even longer!) due to their hard seed coat. Patience is key! Soak seeds overnight before planting and keep soil consistently moist but not soggy to encourage faster germination. Pro tip: Use a heat mat (70–75°F) to speed things up!
Why aren’t my lavender seeds sprouting?
Lavender seeds need light, warmth, and consistency to break dormancy. Common culprits:
- Cold soil: Lavender hates damp, chilly conditions—wait until soil is at least 60°F.
- Overwatering: Seeds rot if smothered; keep soil lightly damp.
- Poor seed viability: Older seeds (over 1 year) may fail—source fresh ones!
Can I grow lavender from store-bought dried lavender?
Nope! Dried lavender flowers won’t produce viable seeds—they’re sterile. For sprouts, you must use fresh lavender seed pods (harvested from live plants) or buy seeds from a reputable supplier. Alternative idea: Propagate from cuttings if you love lavender but hate waiting for seeds!
When should I transplant lavender seed sprouts?
Transplant once seedlings have 2–3 true leaves (not just the initial seed leaves) and are about 2–3 inches tall. Harden them off for 5–7 days before moving to their final spot—lavender hates being disturbed! Choose a sunny, well-draining area (like a slope or raised bed) to prevent root rot.
What’s the best soil mix for lavender seed sprouts?
Lavender thrives in fast-draining, sandy, or gravelly soil with a pH of 6.0–8.0. Mix:
- 50% cactus/succulent mix (for drainage)
- 30% perlite or coarse sand
- 20% peat moss or coco coir (for moisture retention)
Wrapping up and next steps
Growing lavender seed sprouts doesn’t have to be a daunting task—with the right approach, you can nurture fragrant, resilient plants right from your backyard! 🌱 Whether you’re a seasoned gardener or a curious beginner, these simple steps ensure stress-free germination and thriving seedlings.
Now that you’re equipped with the knowledge, why not take the next step?
- 🌿 Start small: Try a few seeds in pots before expanding to your garden.
- 📅 Keep a journal: Track soil moisture, sunlight, and growth milestones for future reference.
- 🌸 Share the joy: Gift a few sprouted seedlings to fellow plant lovers—lavender’s calming scent is the perfect gift!
Your green thumb is ready—let those lavender sprouts bloom with confidence! 🌞