
Transplanting
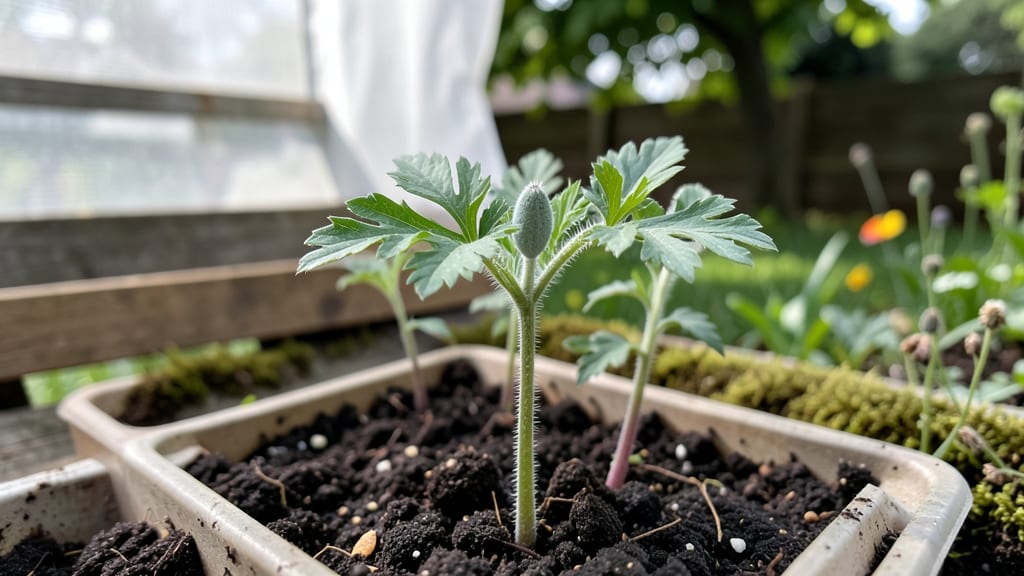
Twisting breadseed poppy pods open for seeds is a gardener’s worst nightmare—until you grow twist-resistant varieties from seed. 🌱 I’ve battled sticky, stubborn pods for years, but these seedlings change everything with their straight, sturdy stems that hold seeds perfectly.
The secret starts with the right soil mix, gentle watering, and just enough light to keep them from stretching like overgrown weeds.
You’ll need a shallow tray, well-draining potting mix, and patience—these seedlings germinate fast but need consistent moisture to avoid damping-off. I’ve lost more poppy starts than I’d like to admit, but the key is keeping the soil damp (not soggy) and providing bright, indirect light from day one.
A simple grow light works wonders if your windowsill isn’t sunny enough.
By the time they’re ready to transplant, your seedlings will stand tall with vibrant green leaves and no leggy stems. The twist-resistant pods form later, but the foundation is set now—no more wrestling with stubborn seed heads.
You’ll harvest seeds effortlessly, saving money and ensuring next year’s plants grow true to type.
Works for both beginners and seasoned gardeners—just adjust light and water as needed. The payoff? A lifetime of seeds from your own garden, no more struggling with store-bought varieties. Let’s get those seedlings growing strong!
📚 In This Guide
- What you need
- Instructions
- Tips and common mistakes
- Wrapping up and next steps
What you need
- ● Breadseed poppy seeds – Purchase from a trusted seed supplier (e.g., Papaver somniferum var. nigrum or setigerum). Aim for 10–20 seeds per pot or 1 tbsp per sq ft for direct sowing.
- ● Seed-starting trays or pots – Use biodegradable peat or plastic cell trays (2–3" deep) or 4–6" nursery pots with drainage holes. Pro tip: 💡 3–4 seeds per cell ensures redundancy!
- ● Seed-starting mix – A lightweight, sterile mix (e.g., 50% peat moss, 30% perlite, 20% vermiculite) or a pre-mixed seedling blend with low fertility (avoid compost-heavy soil).
- ● Grow lights or sunny windowsill – Poppies need 12–16 hours of light daily. A full-spectrum LED grow light (12–18" above seedlings) works best.
- ● Misting bottle or spray nozzle – For gentle watering (avoid soaking the soil).
- ○ Humidity dome or plastic wrap – Optional but helpful for keeping moisture levels high until germination.
- ● Small hand trowel or spoon – For planting seeds at ¼" depth.
- ● Fine-mesh screen or paper towels – To cover seeds if sowing outdoors (prevents birds from snacking!).
- ○ Thermometer (optional) – Ideal germination temps: 60–70°F (15–21°C). A heat mat (optional) can speed up germination in cool climates.
- ● Labels & markers – To track varieties (e.g., ‘Blue Lake’ or ‘Black Spanish’) and planting dates.
- ● Fertilizer (low-nitrogen) – Once seedlings sprout, use a balanced 5-5-5 or 10-10-10 diluted to ½ strength every 2–3 weeks.
- ○ Hardening-off tray (optional) – A shaded outdoor space or mesh cage for acclimating seedlings before transplanting.
Step-by-step guide to growing breadseed poppy seedlings
Here's how to nurture sturdy poppy seedlings that develop the twist-resistant pods you need for reliable seed saving.
🌱 Step 1: Start Seeds Indoors at the Right Time
Breadseed poppies thrive when sown indoors 6-8 weeks before your last frost date—this gives them enough time to mature before cool weather sets in. Fill small seed-starting trays with sterile seed-starting mix (never garden soil) and press it down lightly to create a firm surface. Poppy seeds are tiny, so I like to mix them with a little sand first to ensure even distribution.
Sow seeds just below the soil surface—no deeper than ¼ inch—since they need light to germinate properly. Mist the surface gently with water until evenly moist, but avoid soaking the mix. Place the trays in a warm spot (70-75°F) with bright, indirect light. You'll see the first green shoots within 7-14 days, depending on your climate.
☀️ Step 2: Provide Optimal Light for Strong Seedlings
Poppy seedlings need 12-14 hours of light daily to prevent leggy growth, so a south-facing window won’t cut it unless it’s exceptionally sunny. I use a grow light positioned 2-3 inches above the seedlings and raise it as they grow. Without enough light, stems stretch thin and weak, making them prone to snapping when you later harvest pods.
Watch for first true leaves—these are the second set of leaves that appear after the initial cotyledons. Once you see them, it’s time to thin seedlings to 1 inch apart in the tray. Use small scissors to snip unwanted seedlings at soil level rather than pulling them, which can disturb roots and invite disease.
🌿 Step 3: Harden Off and Transplant Carefully
Two weeks before your last frost, begin hardening off seedlings by placing them outside in a sheltered spot for 1-2 hours the first day. Gradually increase their outdoor time over 7-10 days, ending with a full day in the sun. This slow transition prevents shock and ensures they develop the resilience needed for pod formation.
Transplant seedlings outdoors when nighttime temperatures stay above 50°F and all danger of frost has passed. Space them 12-18 inches apart in well-draining soil—poppies hate soggy roots. Water deeply at planting to settle the soil, but avoid overwatering afterward. Breadseed poppies are drought-tolerant once established, so let the soil dry out between waterings.
✂️ Step 4: Support Pod Development for Easy Harvesting
As seedlings mature, you’ll notice the iconic poppy blooms opening in the morning and closing by afternoon. To ensure twist-resistant pods, avoid handling the flowers—even gentle touch can cause them to drop prematurely. Instead, let nature do its work: the pods will naturally twist and dry on the plant.
When pods turn brown and papery, they’re ready for harvest. Gently twist them off the stem—they should release easily if the plant has been watered consistently but not overwatered. Store pods in a cool, dry place until you’re ready to save seeds. If pods twist too tightly before drying, it’s a sign the plant was stressed by inconsistent moisture or poor soil drainage.
Tips & tricks for growing sturdy breadseed poppy seedlings
Real talk: The difference between twist-resistant pods and brittle failures often comes down to these small details during each growth stage.
Seed Starting Precision: I learned this the hard way after ruining three batches—poppy seeds need that ¼-inch depth for a reason. Any deeper and they won't germinate; any shallower and they'll dry out. The sand trick isn't just for even distribution; it also helps you see where you've sown them without disturbing the delicate mix. After sowing, I like to place the trays in a sealed plastic bag for 24 hours to maintain humidity while keeping them in that 70-75°F warm spot.
Lighting Strategy: Those 12-14 hours of light are non-negotiable for preventing leggy seedlings. If you don't have a grow light, position your seedlings within 6 inches of a bright south-facing window during the day and supplement with a LED desk lamp at night. Watch for stems that look like they're reaching—this is your plant begging for more light. The 2-3 inch distance from the grow light is crucial; too close and you'll burn the tender leaves.
Transplanting Technique: The 12-18 inch spacing might seem generous, but it prevents competition that leads to weak stems. When transplanting, I make a small hole with my finger and place the seedling in it at the same depth it was in the tray. Gently firm the soil around it and water immediately—this helps the roots establish contact with the surrounding soil. The key is to avoid disturbing the root ball at all during this process.
Pod Development Secret: Here's what nobody tells you—the pods won't twist properly if the plant experiences moisture stress at any point. That's why I water deeply but infrequently once established, letting the soil dry completely between waterings. The brown and papery stage is your cue to harvest, but if pods feel tough or crack when you try to twist them, it means the plant was either underwatered or overwatered during development.
Pro Tips for Breadseed Poppy Seedlings
- Real talk: The difference between twist-resistant pods and brittle failures often comes down to these small details during each growth stage.
- Seed Starting Precision: I learned this the hard way after ruining three batches—poppy seeds need that ¼-inch depth for a reason.
- Lighting Strategy: Those 12-14 hours of light are non-negotiable for preventing leggy seedlings.
Frequently asked questions
Got questions about growing breadseed poppy seedlings? You’re not alone! Here are answers to the most common ones to help you navigate your seed-saving journey with confidence.
When should I start planting breadseed poppy seeds indoors?
For most climates, sow seeds indoors 8–10 weeks before your last frost date. Breadseed poppies germinate quickly (5–14 days), so early starts ensure sturdy seedlings before transplanting. If you’re in a warm region, you can even direct-sow outdoors in early spring—just keep an eye on frost warnings!
What’s the ideal temperature for germinating breadseed poppy seeds?
Breadseed poppies thrive in cool to moderate temperatures (60–75°F). Avoid overheating trays or seedling mixes, as excessive heat can stunt growth. A sunny windowsill or grow light works well. If your home runs warm, consider a cooling mat or ventilated propagator to mimic outdoor conditions.
Why are my seedlings leggy or weak?
Leggy seedlings usually mean too little light or overcrowding. Move trays to a brighter spot (south-facing window or grow lights) and thin seedlings to 1–2 inches apart. If roots are circling, gently tease them apart or repot into slightly larger containers with fresh soil.
Can I save seeds from store-bought breadseed poppies?
Yes! If you grow poppies from store-bought seeds, the resulting plants will produce pods—but they may not be true to the original variety. For consistent traits, source seeds from a trusted heirloom supplier or save seeds from open-pollinated varieties grown in isolation (at least 500 feet from other poppies).
What’s the best way to harden off breadseed poppy seedlings?
Start hardening off 1–2 weeks before transplanting by placing seedlings outdoors in partial shade for 2–3 hours daily, gradually increasing exposure. Avoid windy days and water lightly before bringing them back inside. This toughens stems and reduces transplant shock when it’s time to plant in the garden.
Are there any common pests or diseases to watch for?
Breadseed poppies are generally pest-resistant, but keep an eye out for aphids or slugs, especially in damp conditions. Use row covers for young plants and handpick pests if needed. Overwatering can lead to fungal issues, so ensure well-draining soil and avoid soggy roots.
Wrapping up and next steps
Growing breadseed poppy seedlings is a rewarding journey that rewards you with twist-resistant pods and effortless seed-saving success! With the right materials, patience, and care, you’ll soon enjoy a thriving garden filled with these unique beauties.
Whether you’re a seasoned gardener or just starting out, every seedling you nurture brings you closer to a bountiful harvest.
Ready to take the next step? Plant those seedlings in well-draining soil, keep them happy with consistent watering, and watch your garden transform! 🌱✨ Happy growing—and may your poppy pods be ever twist-free!