Lawn
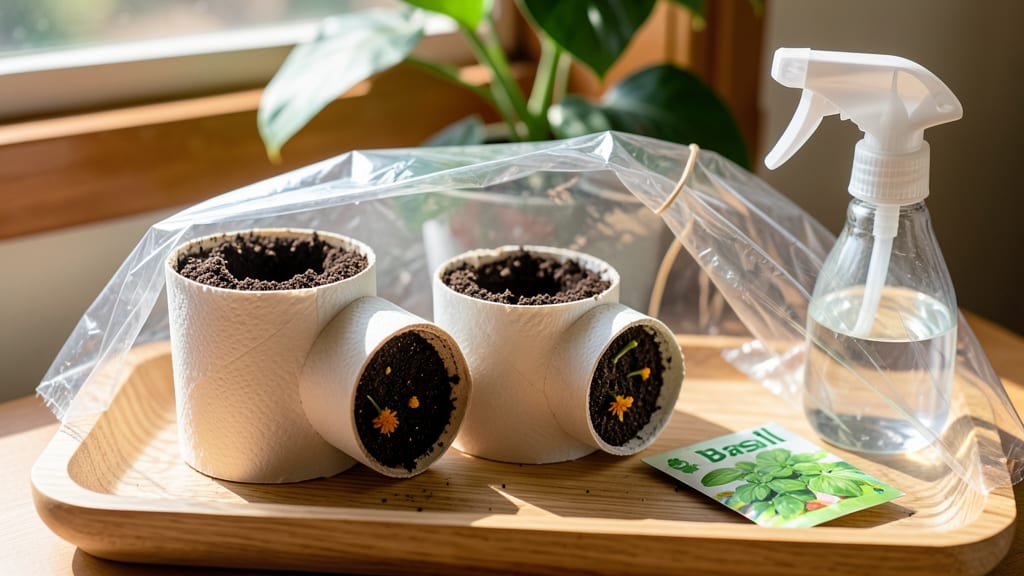
Turn empty toilet paper rolls into seed starters that speed up germination by 30-50%—no extra cost, no waste. 🌱 I started using them after seeing my seedlings struggle in flimsy plastic trays, and now I swear by this method for everything from tomatoes to herbs.
The key is keeping them moist without drowning the roots while giving seedlings sturdy walls to push against. You only need toilet paper rolls, potting soil, and a few seeds—no fancy equipment. Cut the rolls into 3-inch sections, fill with damp soil, and plant 2-3 seeds per roll.
The rolls act like mini-greenhouses, trapping warmth and humidity while protecting delicate sprouts from pests. I’ve even marked the rolls with a pencil before planting to track varieties.
By the time they’re ready to transplant, those rolls break down completely, leaving you with strong seedlings that handle the move to soil like pros. The first time I did this, my basil went from sprouts to harvest-ready in 21 days—half the time of my old method.
No more weak, leggy seedlings either. This works for any seed that needs warmth to germinate, from peppers to lettuce. Just avoid using it for giant seeds like beans or corn. Ready to try it?"
📚 In This Guide
- What you need
- Instructions
- Tips and common mistakes
- Wrapping up and next steps
What you need
- ● Toilet paper rolls: 2–10 (clean, empty, and free of plastic coatings—check the label!)
- ● Seeds: Fast-growing varieties like basil, lettuce, radishes, or sunflowers (start with 1–2 seeds per roll).
- ● Potting soil: 1–2 cups of seed-starting mix (lightweight, sterile, and well-draining).
- ● Water: A spray bottle or small watering can (for gentle hydration).
- ○ Scissors or craft knife: To trim rolls if needed (optional for snug fits).
- ● Biodegradable mesh or coffee filters: To cover the bottom of rolls (prevents soil leakage).
- ● Plant markers: Popsicle sticks or labels to track seed types.
- ● Clear plastic wrap or dome: Creates a mini greenhouse effect (speeds up germination!).
- ● Tray or shallow container: For collecting runoff water (recycle it!).
Step-by-Step instructions for toilet paper seed starters
Here’s how to turn everyday rolls into a zero-waste, speedy way to grow strong seedlings.
💧 Step 1: Prep the Toilet Paper Rolls
Start by cutting each roll into 2-inch sections—this gives you enough space for a single seedling to grow without crowding. I like to stack them vertically in a shallow tray or container to save space, but you can lay them flat if you prefer. The key here is to keep them stable so they don’t topple when you add moisture.
Roll each section tightly to form a small tube. This creates a snug, supportive structure that mimics the natural environment seeds need to sprout. If the edges fray, gently tuck them in or secure with a twist tie—just enough to hold the shape without restricting airflow.
🌱 Step 2: Soak and Load the Rolls
Fill a shallow dish with 1 inch of water and place the rolled sections upright in it, leaving the open end exposed. Let them soak for 10-15 minutes until the paper is fully saturated but not dripping. This step ensures the toilet paper holds moisture without becoming soggy, which can stunt germination.
Once soaked, carefully remove the rolls and let them drain for a minute. Now, place 1-2 seeds (depending on size) into the open end of each tube. For larger seeds like beans, I press them gently into the paper so they stay in place. Smaller seeds, like lettuce or herbs, just need a light touch—no need to bury them deep.
☀️ Step 3: Create a Humid, Warm Germination Environment
Place the loaded rolls in a sealed plastic bag or under a clear dome to trap humidity. This mimics the damp conditions seeds crave to break through the soil. I like to prop them up in a sunny windowsill or under a grow light—just make sure the temperature stays between 65-75°F for fastest results.
Check daily for moisture. The paper should stay damp but not wet; if it dries out, mist lightly with water. You’ll see the first sprouts in 3-7 days, depending on the seed type. The moment you spot those tiny green shoots, remove the cover immediately—too much humidity now can cause mold or damping-off.
🌿 Step 4: Transplant When Ready
Once seedlings have 2-3 true leaves (not just the initial cotyledons), they’re ready to move. Gently unroll the toilet paper and slide the seedling (still wrapped) into its own small pot or directly into the garden. The paper will break down naturally, so no need to remove it—it’s like a biodegradable seedling sleeve.
Water lightly after transplanting to help settle the roots. If you’re moving them outside, do it gradually over 3-5 days to harden them off. I’ve found this method works best for fast-growing plants like radishes, beans, and herbs—perfect for a quick harvest or early spring starts.
Tips & tricks for perfect toilet paper seed starters
Here's what nobody tells you about making these starters work like a pro.
Prep Like a Pro: When cutting your toilet paper rolls into 2-inch sections in Step 1, use a sharp pair of scissors to create clean cuts. The cleaner the cut, the more stable your tubes will be when you load them with seeds. I also recommend cutting a small slit in one side of each tube before rolling—this creates a tiny air pocket that prevents the paper from sticking together when wet.
Soak Smart: The 10-15 minute soak in Step 2 is crucial—don't skip it! But here's the thing: if you're using thick, multi-ply toilet paper, you might need the full 15 minutes. For thinner paper, 10 minutes is plenty. Test one tube by squeezing gently: if water drips out, it's soaked enough. Over-soaking makes the paper mushy and can suffocate your seeds.
Seed Placement Secrets: For Step 2, place larger seeds like beans right at the bottom of the tube where it's widest. Smaller seeds can go slightly higher up. The key is to position them where they'll have room to push through the paper without getting stuck. I've found that pressing seeds gently into the paper (rather than just dropping them in) gives them better contact with moisture.
Transplanting Hack: In Step 4, when transplanting those 2-3 leaf seedlings, I like to make a small slit in the bottom of the toilet paper tube before sliding it into soil. This allows roots to emerge more easily and prevents the tube from acting like a water barrier. The paper will break down completely in 2-4 weeks, so no need to remove it—just give your plants a little extra water for the first few days after transplanting.
Pro Tips for Toilet Paper Seed Starters
- Here's what nobody tells you about making these starters work like a pro.
- Prep Like a Pro: When cutting your toilet paper rolls into 2-inch sections in Step 1, use a sharp pair of scissors to create clean cuts.
- Soak Smart: The 10-15 minute soak in Step 2 is crucial—don't skip it!
Frequently asked questions
Got questions about toilet paper seed starters?
You’re not alone! Here are answers to the most common queries—so you can grow confidently and waste nothing.
Can I use any type of toilet paper for seed starters?
Yes, but opt for unbleached, 100% recycled toilet paper to avoid chemicals that could inhibit germination. Avoid scented or dyed varieties—they may contain additives harmful to seeds. If your TP isn’t recycled, look for seed-starting-specific rolls or use newspaper instead!
How long does it take for seeds to sprout in toilet paper?
Germination time varies by seed type, but most fast growers (like lettuce, herbs, or radishes) sprout in 3–7 days. Keep the roll moist and in a warm spot (70–75°F) for best results. Slower seeds (e.g., tomatoes) may take 1–3 weeks. Patience is key—just mist regularly!
What if my seeds aren’t sprouting after a week?
Don’t panic! First, check moisture—too dry = dormant seeds, too wet = mold. Try gently unrolling the TP to inspect for sprouts hiding inside. If nothing’s happening, test seed viability by planting a few in soil. If they still fail, your seeds may be old or stored improperly.
Are toilet paper seed starters better than peat pots?
Toilet paper starters are zero-waste, biodegradable, and cost-free compared to peat pots (which often end up in landfills). They’re also more compact, making them ideal for small spaces. Plus, you’re upcycling—win-win! Just ensure you’re using seed-friendly materials (like the ones listed earlier).
Can I reuse toilet paper rolls for other gardening tasks?
Yes! Once seeds sprout, you can plant the entire TP roll directly into soil—it’ll break down naturally. For other uses, cut rolls into rings to support seedlings or as mini planters for herbs. Just avoid reusing them for sprouting again (sanitation risk), but get creative with repurposing!
Will cold weather affect my toilet paper seed starters?
Cold slows germination, but most seeds will still sprout if kept consistently moist and warm. For extra help, place your roll in a seedling heat mat or near a sunny window. If temps drop below 50°F, consider moving them indoors until soil warms up. Hardier seeds (like peas) can handle cooler starts!
Wrapping up and next steps
Transforming toilet paper rolls into seed starters isn’t just eco-friendly—it’s a game-changer for fast, fuss-free germination! 🌱 With minimal effort and zero waste, you’ve got a sustainable way to kickstart your garden while saving money.
Whether you’re a seasoned gardener or just starting out, this method proves that small actions can yield big results.
Ready to grow your green thumb further? Try experimenting with different seeds or even repurposing other recyclables like egg cartons. Your garden—and the planet—will thank you!