
Propagation
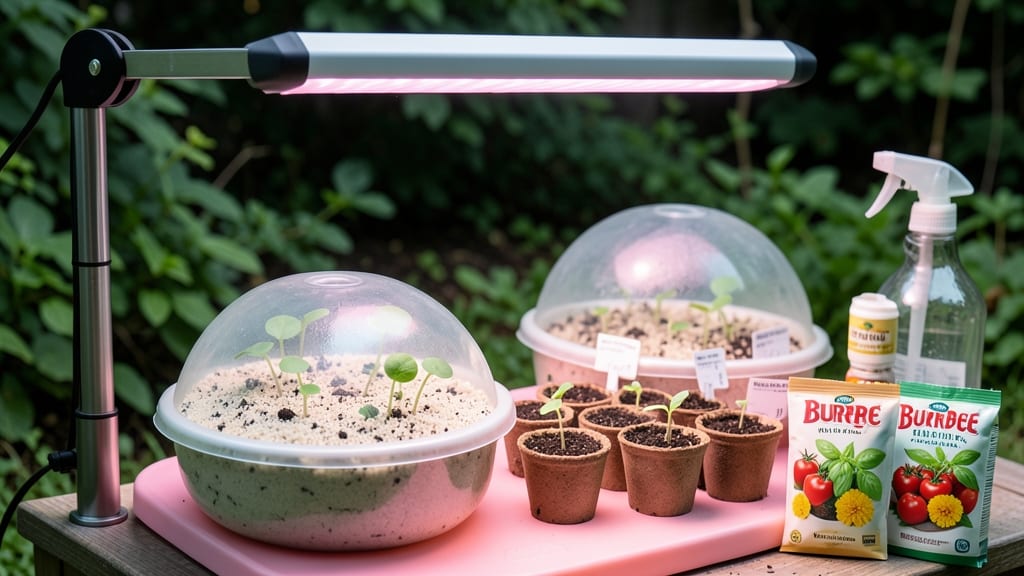
The Burpee seed starting system turns my dark basement corner into a fast-growing greenhouse that outpaces store-bought seedlings. 🌱 I’ve used it for three seasons now—from crisp peppers to delicate petunias—and the difference in germination speed and root strength is shocking.
Most seed-starting mixes either dry out too quickly or stay soggy for weeks, but this loam-based formula hits the sweet spot every time.
Here’s the beauty of it: you don’t need fancy equipment. A simple tray, this pre-mixed soil, and a heat mat (or even a sunny windowsill) are all you need to get started.
The secret’s in the balanced moisture retention—seeds sprout in 5-7 days (not the 2+ weeks I used to wait), and seedlings develop thick, sturdy roots that handle transplanting like pros. No more leggy, weak plants that flop in the garden.
By the time your neighbors are still waiting for their mail-order seedlings to arrive, yours will already be 3 inches tall with two sets of true leaves. The controlled environment keeps pests out, and the fine texture prevents damping-off disease—the nemesis of every beginner’s seed-starting journey.
You’ll know exactly when to harden off plants because the system’s consistency means predictable growth.
Works for any cool-season or warm-season crop, from tomatoes to herbs. The only thing you’ll outgrow is your patience for slow germination. Let’s get those seeds sprouting!
📚 In This Guide
- What you need
- Instructions
- Tips and common mistakes
- Wrapping up and next steps
What you need
- ● Burpee Seed Starting Mix: 1 bag (1 cubic foot or ~12 quarts) – specifically formulated for seed starting
- ● Seedling trays: 1020-cell or 72-cell trays (or 10-inch square trays) – with drainage holes
- ● Seeds: Your chosen varieties (check packet for spacing/depth guidelines)
- ● Spray bottle: 16 oz with a fine mist nozzle – for gentle watering
- ● Flat tray or baking sheet: 1 – to hold trays during watering
- ● Grow lights or sunny windowsill: Access to 6–8 hours of light daily – LED grow lights work best
- ● Plastic wrap or humidity dome: 1 sheet – to retain moisture during germination
- ● Small hand trowel or spoon: 1 – for filling trays and planting seeds
- ● Seedling heat mat: 1 – speeds up germination for cool-season crops
- ● pH testing kit: 1 – to ensure mix is slightly acidic (5.8–6.2)
- ● Label markers & tags: 1 pack – avoid mix-ups with varieties!
- ● Fine-mesh screen: 1 – for sifting mix into trays
- ● Fertilizer (low-dose): Water-soluble seed starter (e.g., Burpee Bio-Gro) – use sparingly after germination
How to use the Burpee seed starting system for reliable germination
This system transforms ordinary potting mix into a powerhouse for quick, vigorous starts.
🌱 Step 1: Prepare the Burpee Loam Base
Burpee's proprietary loam contains all the nutrients and moisture retention you need, but it still benefits from a few adjustments. Start by sifting the mix through a coarse screen to eliminate clumps—this ensures even moisture distribution and prevents air pockets that stall root growth. I like to add a handful of perlite to every 4 cubic feet of mix to improve aeration without sacrificing moisture.
Here's the thing—Burpee loam works best when pre-moistened to a "squeeze-and-hold" consistency. Fill a shallow tray with the sifted mix and water it gently until it feels like a damp sponge. Too much water creates anaerobic pockets where roots suffocate, while too little causes seeds to dry out before germination. You'll know it's right when water beads form on the surface but doesn't pool.
💧 Step 2: Plant Seeds at Optimal Depth and Spacing
Burpee's system recommends planting seeds at a depth equal to twice their diameter—this shallow placement ensures they won't exhaust their energy reserves trying to reach light. For tiny seeds like lettuce or petunias, I use a toothpick to create precise planting holes just ¼ inch deep. Larger seeds like beans or tomatoes go ½ inch below the surface.
Don't crowd the seeds—space them according to the packet's recommendations, even if it means thinning later. I've found that seedlings grown too close compete for nutrients, resulting in weak stems and yellowing leaves. The goal is to give each seedling room to develop its own root system without smothering neighbors.
☀️ Step 3: Maintain Ideal Germination Conditions
Burpee loam works best when kept at 70-75°F during germination. Place your seed trays on a seedling heat mat if your home runs cooler—this small investment cuts germination time by nearly half. Cover the trays with clear plastic domes or plastic wrap to create a mini greenhouse effect, but remove them immediately once sprouts appear to prevent fungal diseases.
Watering is critical during this phase. Mist the soil surface lightly every 2-3 days until you see the first true leaves—don't let it dry out completely, but avoid soggy conditions that invite rot. You'll know moisture is perfect when the soil surface looks slightly damp but doesn't glisten. This balance is what makes Burpee loam so effective—it retains enough moisture while still allowing excess to drain.
🌿 Step 4: Transition to Light and Air Circulation
The moment seedlings develop their first true leaves (not the initial seed leaves), it's time to move them under grow lights or to a south-facing window. Burpee loam's nutrient density means seedlings grow fast, but without sufficient light, they'll stretch toward any available source—this leggy growth is nearly impossible to correct later. Position lights 2-3 inches above the plants and raise them gradually as seedlings grow.
Start introducing fresh air by removing the humidity dome for 1 hour daily, gradually increasing exposure. This hardening-off process prevents shock when you eventually transplant. You'll notice stronger stems and deeper green leaves within a week—this is your signal that the Burpee system is working exactly as intended.
⏰ Step 5: Fertilize and Transplant at the Right Time
Burpee loam contains controlled-release nutrients, but you'll want to supplement with a balanced liquid fertilizer (10-10-10) at half-strength when seedlings develop their third set of true leaves. This timing ensures they have enough energy to establish strong roots before transplanting. I use a spray bottle for even distribution—never drench the soil, as this can wash away nutrients and disrupt root development.
Transplant when seedlings have 4-6 true leaves and their stems are thick enough to handle gentle handling. Burpee loam's loose texture makes it easy to remove seedlings without breaking roots. Water thoroughly after transplanting to help settle the soil around the roots—this is the moment that determines whether your starts thrive or struggle in their permanent home.
Tips & tricks for perfect seed starting with Burpee loam
These game-changing strategies will help you maximize the Burpee system's potential for lightning-fast germination and robust seedlings.
Soil Preparation Secret: After sifting your Burpee loam, I recommend adding a thin layer of horticultural charcoal (about 1 tablespoon per quart of mix) to prevent fungal issues during germination. This optional step creates a sterile environment while maintaining the loam's excellent moisture retention. The charcoal also helps neutralize any potential odors from organic matter—something I discovered after my first batch of seedlings developed a faint musty smell.
Precision Planting Tools: For seeds smaller than ¼ inch, I use a fine-tip tweezers instead of toothpicks to handle them without crushing. This gives you the delicate control needed for seeds like basil or parsley that might get damaged with a toothpick. The tweezers also help you maintain the exact planting depth specified in Step 2, which is crucial for preventing seedling stress.
Temperature Consistency: While 70-75°F is ideal, I've found that using a small digital thermometer probe in the soil gives you real-time feedback. Burpee loam can sometimes trap heat, especially in clear plastic trays. If your probe reads above 78°F, move the tray to a cooler location—this prevents seedling shock and ensures even germination across all seeds. The slight investment in a thermometer pays off when you see uniform sprouting.
Light Transition Strategy: When moving seedlings to grow lights in Step 4, I recommend starting with lights on a 16-hour cycle (16 hours on, 8 hours off) to mimic natural daylight. This extended light period prevents that classic "leggy" growth that occurs when seedlings stretch toward insufficient light. Gradually reduce to 14 hours as they mature—this gradual adjustment helps them adapt without shock.
Pro Tips for Burpee Seed Starting System
- These game-changing strategies will help you maximize the Burpee system's potential for lightning-fast germination and robust seedlings.
- Soil Preparation Secret: After sifting your Burpee loam, I recommend adding a thin layer of horticultural charcoal (about 1 tablespoon per quart of mix) to prevent fungal issues during germination.
- Precision Planting Tools: For seeds smaller than ¼ inch, I use a fine-tip tweezers instead of toothpicks to handle them without crushing.
Frequently asked questions
about the Burpee Seed Starting System—because even the best gardeners need a little extra help! Here are answers to the most common questions to get you growing with confidence.What’s the best time to start seeds in the Burpee system?
The ideal timing depends on your climate and seed type. For most veggies, start 6-8 weeks before the last frost (check your local frost date!). Leafy greens and herbs can go in earlier, while tomatoes and peppers need warmth—so wait until indoor temps are consistently above 60°F. The Burpee loam’s moisture retention helps seeds sprout faster, so don’t delay if conditions are right!
Can I reuse the Burpee loam or trays?
While you can reuse the trays (clean them with soapy water and disinfect), the loam itself isn’t designed for reuse. Old soil can harbor diseases or lose nutrients. For best results, compost the used loam and start fresh each season. Pro tip: Sterilize trays with a 10% bleach solution (rinse well!) to prevent mold.
What if my seeds aren’t germinating?
Don’t panic! First, check moisture—the loam should feel like a damp sponge. If seeds still won’t sprout, try these fixes:
- Warmth: Place trays on a seedling heat mat (70–75°F is ideal for most seeds).
- Light: Seeds need indirect light until they sprout; move them under grow lights after germination.
- Freshness: Test seed viability by soaking a few in water—if they sink, they’re likely good.
Are there alternatives to Burpee loam?
If you’re DIY-inclined, mix 50% peat moss, 30% perlite, and 20% compost for a similar effect. Pre-mixed seed-starting blends (like FoxFarm or Black Gold) also work well. Just ensure the mix is sterile and well-draining. The Burpee system’s advantage? Its pre-fertilized loam eliminates guesswork for beginners!
How do I transition seedlings to outdoor pots?
Start hardening off your seedlings 7–10 days before transplanting by placing them outside in partial shade for 2–3 hours daily, gradually increasing exposure. When moving to pots, use the Burpee system’s foam insert to lift seedlings gently—avoid pulling by the stems! Water thoroughly after transplanting and keep soil moist for the first week.
Wrapping up and next steps
The Burpee Seed Starting System is your secret weapon for fast, reliable germination and robust seedlings—no green thumb required! 🌱 With the right mix of loam, moisture, and warmth, you’ll transform tiny seeds into thriving plants in record time.
Whether you’re a seasoned gardener or a curious beginner, this system simplifies the process while maximizing success.
Now that you’re armed with the knowledge, take the next step! Start small with a few easy seeds like basil or marigolds, then expand your garden confidence. Happy planting—your future harvests are waiting! 🌿